
Introduction and Setting Up
Welcome to the first lesson in this tutorial series covering the basics of rendering graphics!
This lesson will be a quick one hopefully - we're going to look at how to setup and layout your workspace so that you can run the code for the rest of the lessons.
What is WebGL?
Before we get into that though, I just want to take a minute to look at the main JavaScript library we will be using to build our site.
In these tutorials, we will be using WebGL, an open Graphics Library for web browsers. WebGL basically serves as a JavaScript API to draw graphics in a browser in a way that can fully and automatically exploit the power and speed of GPUs. The API has been supported by every major browser since around 2010, although there was quite a significant update around 2015: WebGL 2. WebGL 2 is the version we will be targeting, also enjoying the support of every modern browser.
WebGL is the JavaScript implementation of a more general API called OpenGL. This is a standardised, cross-platform API for calling functions on the GPU via the graphics card driver. There are functions for example to take textures or 3D model data and "upload" that data to the GPU. This will mean the data then resides there rather than in regular RAM, and can be used for extremely fast draw calls in the future.
Building a basic page
Let's start by building a basic web page to check everything is set up correctly.
Start by creating a folder in which your files will be stored.
Then inside it create a regular text file named index.html with the following contents:
| 1. | |
| 2. | |
| 3. | |
| 4. | |
| 5. | |
| 6. | |
| 7. | |
| 8. | |
| 9. | |
| 10. | |
| 11. | |
| 12. | |
| 13. | |
| 14. | |
| 15. | |
Here we've created the basic structure of a HTML web page. If you're a JavaScript programmer then I hope this is already at least somewhat familiar to you, so I'll skim over most of it!
The important things to note here are that we've loaded an external CSS stylesheet from style.css so we can keep our HTML clean from formatting.
We've also loaded external JavaScript code from a file named main.js.
We'll create both these files in a moment.
We also add a function to our web page's body, so that when the page has finished loading, it begins to run our JavaScript's initialise() function.
Let's implement this function next.
Create another file in the same folder named main.js, with the following contents:
| 1. | |
| 2. | |
| 3. | |
| 4. | |
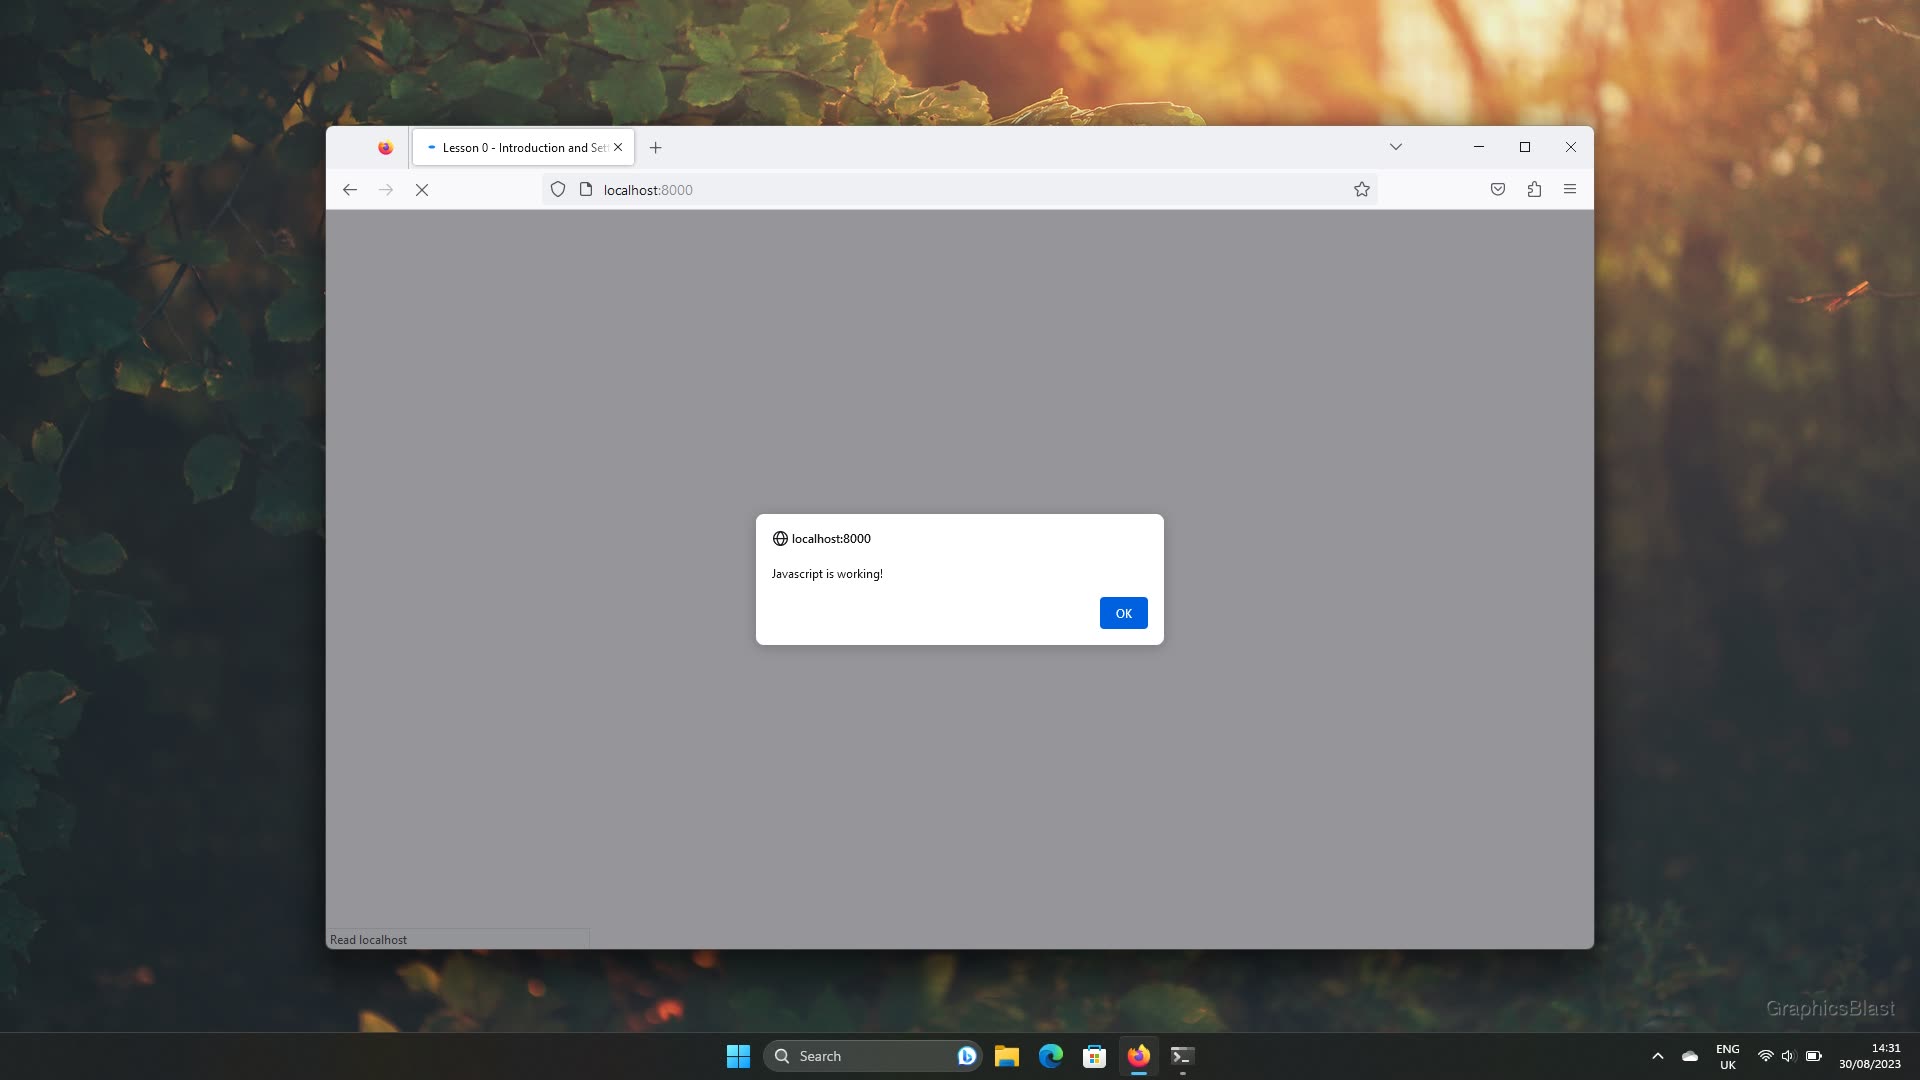
If our page has loaded correctly, and the JavaScript executes properly, we will see a pop-up informing us that it's working.
Just before we test it though, let's create our stylesheet which we defined in our HTML, where we can add some CSS decoration to our page. There's not much to add to it right now, but I like to have these things laid out nicely from the start!
Create a new file called style.css in your workspace with the following contents:
| 1. | |
| 2. | |
| 3. | |
| 4. | |
For now we just add some (very) subtle colouring to our page's background.
Testing our set-up
To check our new web page is functioning correctly, we need to serve it to a browser.
Serving the page locally
The simplest way to serve the files is to just open the HTML file with a browser.
You can identify a page opened this way because it's URL will start with file://.
While using this method will work for now, you will quickly run into issues if you develop your site like this.
Opening the webpage like this does not serve it over the HTTP protocol, and you can end up with strange problems due to security restrictions. Browsers are not big fans of JavaScript code being able to read random files from your hard drive, so any resources loaded like this through JavaScript will be blocked.
A much better way is to properly serve the web pages with a web server over HTTP. This is quick to do and will serve the pages in the same way that a full web deployment would.
There are a few ways to do this. For example, we can open a terminal, move to the correct directory, and then type the following:
| 1. | |
This is a simple method I commonly use, which runs the default python module to serve files over HTTP from the current folder. You should see a message indicating the "web" address the folder is now being served on, and can open this in your browser.
Note that there are lots of other simple tools to achieve this, so feel free to use an alternative if you prefer something else. There are many other methods listed here. This is just my preferred tool.
Also note that this web page may be visible to other computers on your local network who know the address, so you can test what the web page looks like on your phone too! You will probably need to replace the IP address with that of your local machine though. However, assuming you have a normal network configuration with a router, the page will not be visible to the internet.
Once you open the URL, by default your browser will look for and open a file named index.html within the current directory.
If your try this now, our page should appear, which will trigger the loading of our JavaScript code.
If you can see the pop-up box, then everything is working and setup correctly.
Serving your page to the internet
Once the development phase of your website is finished, you can look to serve your web pages live on the internet. If you are already aware of how to serve web pages using a file server, or don't want to serve to the internet just yet, you can skip this section.
To serve you web pages to the world, you either need a computer permanently connected to the internet and with a static IP address, or to simply rent one from an online provider.
Once you have this, typically you install either Apache or Nginx to serve your files for you. Compared to the simple local hosting methods from the previous section, Apache and Nginx tend to be better suited to large scale deployments and have better support for things like HTTPS and other routing configurations. These programs are called file servers, and listen for incoming web connections, and return the requested files to the computer which asked for them.
The differences between Apache and Nginx these days are minimal, so which program you pick is just personal preference.
I am using...
Your first step will be to install Apache.
In most Linux distributions, it will be available using your package manager under the name apache2, so run this in a terminal to install it:
| 1. | |
Apache should start automatically. If you point a browser towards the server's URL (or to "localhost" if running it on your own machine), you should now be greeted by a default test page.
By default, it serves the web pages from /var/www/html.
In there, you will find the raw HTML of the default test page.
If you want to continue using this folder, and having it's contents available publicly, you will need to alter the folder's permissions, as by default it cannot be altered by the current user. The following command will make the user the owner of the folder, and everything there should become editable to the current user account.
| 1. | |
Alternatively, you can modify the settings for your website in /etc/apache2/sites-enabled/.
This folder contains the configurations for each website you wish to have.
Note that this is for whole websites, not specific pages.
There should be a file in there already for the default test page.
If you open that file, you will see a line starting with DocumentRoot.
This tells Apache the root folder you wish to serve.
Bear in mind that Apache does not have permission to read your user's home folder by default.
To configure a domain name, you need buy a domain from a DNS provider, and point it to the IP address of your machine.
Then, in your configuration file, set the ServerName variable to this domain name.
It is common to also set up a second domain too, so you have one both with and without a "www." prefix.
Both need to be configured with your DNS provider, and in your Apache configuration file.
My configuration has these:
| 1. | |
| 2. | |
That's pretty much it. Your web pages should now be available to the world!
One additional point you may wish to consider is that these days, HTTPS is widely available for free, and provides an additional layer of security to your site. Specifically, it means that the data flowing between your server and user's computers can no longer be read (and potentially modified) en-route, which is particularly important when passwords are being sent - although not necessary if your website is "read-only".
For HTTPS, I suggest using Let's Encrypt, a charitable organisation funded by most major tech companies. They provide a tool which will automatically get you an HTTPS certificate, renew it when necessary, and automatically add it to your Apache configuration.
Your first step will be to install Nginx. In most Linux distributions, it will be available from your package manager by typing this into a terminal:
| 1. | |
Nginx should start automatically. If you point a browser towards the server's URL (or to "localhost" if running it on your own machine), you should now be greeted by a default test page.
By default, it serves the web pages from /var/www/html.
In there, you will find the raw HTML of the test page.
If you want to continue using this folder, and having it's contents available publicly, you will need to alter the folders permissions, as by default it cannot be altered by the current user. The following command will make the current user the owner of the folder, and everything there should become editable to the current user account.
| 1. | |
Alternatively, you can modify the settings for your website in /etc/nginx/sites-enabled/.
This folder contains the configurations for each website you wish to have.
Note that this is for whole websites, not specific pages.
There should be a configuration file in there already for the default test page.
If you open that file, you will see a line starting with root.
This tells Nginx the root folder you wish to serve.
If you want to change this, bear in mind that Nginx does not have permission to read your user's home folder by default.
To configure a domain name, you need buy a domain from a DNS provider, and point it to the IP address of your machine.
Then, in your configuration file, set the server_name variable to this domain name.
It is common to also set up a second domain too, so you have one both with and without a "www." prefix.
Both need to be configured with your DNS provider, and in your Nginx configuration file.
My configuration has these:
| 1. | |
That's pretty much it. Your web pages should now be available to the world!
One additional point you may wish to consider is that these days, HTTPS is widely available for free, and provides an additional layer of security to your site. Specifically, it means that the data flowing between your server and user's computers can no longer be read (and potentially modified) en-route, which is particularly important when passwords are being sent - although not necessary if your website is "read-only".
For HTTPS, I suggest using Let's Encrypt, a charitable organisation funded by most major tech companies. They provide a tool which will automatically get you an HTTPS certificate, renew it when necessary, and automatically add it to your Nginx configuration.
Testing our set-up
Whether you are serving your code locally or globally, you should now be in a position to check that everything is working properly.
If you open the URL to your site in your browser, you will hopefully see the page load without errors, which will also load in our CSS formatting, and our JavaScript code.
The JavaScript code should then be executed when the page has finished loading and create an on-screen pop-up. If all this is happening, then congratulations you can move on to the next tutorial!
If you are having problems, double-check the steps taken during this lesson. A good way to debug is to download the files for this tutorial from the button below, and try to serve those locally. If it now works, then try and identify the differences between your files and those. If it doesn't, then check your file server configuration and browser. It could be as simple as your browser having JavaScript turned off!