
Lesson 15: Entities
In our previous lesson, we looked at loading Wavefront OBJ models into our program so we didn't have to hard-code all our vertex data into our source code. We implemented these models as a class, which took the model's filename as an input, read and processed it's contents, and then made it ready for rendering.
If we look at real-world scenarios though, we often want to have many objects in our world with the same underlying 3D model.
Of course a simple way to achieve this would be to load our model several times and position each these at a different location.
It would be a fairly inefficient solution though - for each object we would duplicate the entire model in GPU memory, and when our program starts we would have to wait for the file to be read multiple times.
A much better solution would be to load each model into our program once and only once, preventing duplication of work and memory. Then we can have each object we want to render in our world simply reference the model data which it should use to draw, but otherwise have it's own set of data for it's position and orientation and anything else it needs. So to create three instances of our crate, we would create three "entity" objects, representing "physical" objects in our virtual world, each with their own model matrix, and each with a pointer to the same underlying crate model which they would use for drawing.
We can extend this idea to textures too, and have each unique texture we wish to use loaded by our program just once, and each entity keep a pointer to which texture it should use for texture mapping.
That sounds much more efficient!
Entity Class
Let's begin constructing an entity class, which will represent an object in our virtual world we want to render.
We'll begin by writing the class's definition to the header file entity.h:
| + 1. | |
| + 2. | |
| + 3. | |
| + 4. | |
| + 5. | |
| + 6. | |
| + 7. | |
| + 8. | |
| + 9. | |
We as always start with a Pragma Once to make sure we can safely include the header file in multiple parts of our code without redefinition problems.
As our entity will keep pointers to it's model and texture, we need to include the class definitions for these from our model.h and texture.h headers.
We then include the GLEW and GLM library header files, which we'll need for using OpenGL functions and types, and for handling the entity's model matrix.
From GLM, we load the core library, as well as type_ptr for accessing the raw type's data, and matrix_transform which we'll use to build the model matrix.
We can now construct the class definition for our entity:
| + 11. | |
| + 12. | |
| + 13. | |
| + 14. | |
| + 15. | |
| + 16. | |
| + 17. | |
| + 18. | |
| + 19. | |
| + 20. | |
| + 21. | |
| + 22. | |
| + 23. | |
| + 24. | |
| + 25. | |
| + 26. | |
| + 27. | |
| + 28. | |
| + 29. | |
| + 30. | |
| + 31. | |
| + 32. | |
| + 33. | |
| + 34. | |
| + 35. | |
| + 36. | |
| + 37. | |
| + 38. | |
| + 39. | |
The class has a constructor to make sure the variables are initialised to safe starting values.
Then we declare a pair of functions for setting the entity's model and texture, with which it will be drawn. These functions expect a pointer to the relevant model and texture, ensuring that the raw data won't be copied in.
After that we have a group of functions for setting, updating and getting the entity's position. By updating here I just mean a function to apply some movement to the entity's current position, rather than setting it's absolute position.
This is then followed by another group of functions for doing the same to the entity's orientation. These functions operate with the entity's roll, pitch, and yaw values in degrees. Note that the roll, pitch and yaw correspond to a rotation in the X, Y, and Z axes respectively, known as the Tait-Bryan angles which we covered previously.
The final set of public functions we'll set up for the entity are for drawing. The first function is to perform a check that the entity is actually possible to draw. If we have an entity which was never passed a model or texture, we won't actually be able to draw the entity, so this function gives us a way to test this, returning a boolean value so we can test that all our entities have been set up properly when loading the program. The final function of the class is then for drawing the entity, which will take care of binding everything and making the draw call to OpenGL.
The class has a few member variables for storing these various values. I've also included a variable for the model matrix. While we could create this from the entity's position and orientation every time we draw, it will only change when either of these values is changed. Therefore when these functions are called, we can calculate and store the new model matrix, and reuse it for each subsequent draw call, saving us from recalculating it every frame.
For convenience, the class has an internal function called updateModelMatrix which will do the actual updating of the model matrix.
Defining our entities
Let's fill in those functions we just declared in a new file called entity.cpp:
| + 1. | |
| + 2. | |
| + 3. | |
| + 4. | |
| + 5. | |
| + 6. | |
| + 7. | |
| + 8. | |
| + 9. | |
| + 10. | |
| + 11. | |
| + 12. | |
| + 13. | |
| + 14. | |
| + 15. | |
| + 16. | |
We start by including the header file for the class, entity.h, and then defining the constructor.
In this case, the constructor sets the position and orientation variables to safe starting values, and ensures our pointers are initialised to NULL. Pointers are undefined by default, so by explicitly initialising them to NULL, we can easily test if they are non-NULL later to ensure the object has been set up properly before attempting to draw with them.
The constructor finishes up by making a call to updateModelMatrix(), our function to generate a model matrix.
As we have initialised everything to zero, this will simply generate an identity matrix, but by calling it here we ensure that the model matrix is initialised and will always be in a valid state.
Next, we can fill in the functions for setting the entity's model and texture:
| 15. | updateModelMatrix(); |
| 16. | } |
| 17. | |
| + 18. | |
| + 19. | |
| + 20. | |
| + 21. | |
| + 22. | |
| + 23. | |
| + 24. | |
| + 25. | |
| + 26. | |
These setter functions simply take a pointer to a model or texture, and store them within the object for drawing with later.
Next up are the entity's getter and setter functions for it's position:
| 25. | texture = newTexture; |
| 26. | } |
| 27. | |
| + 28. | |
| + 29. | |
| + 30. | |
| + 31. | |
| + 32. | |
| + 33. | |
| + 34. | |
| + 35. | |
| + 36. | |
| + 37. | |
| + 38. | |
| + 39. | |
| + 40. | |
| + 41. | |
| + 42. | |
| + 43. | |
| + 44. | |
| + 45. | |
| + 46. | |
| + 47. | |
Nothing too difficult.
To set the position we either assign or add the new coordinates depending on whether we're setting or updating the position.
Each function finishes with a call to updateModelMatrix() to make sure the entity's model matrix takes these new values into account.
To get the entity's position, we just take the coordinates and wrap them in a glm vec3 object before returning them.
Next, we need to do the same for the entity's orientation:
| 46. | return glm::vec3(x, y, z); |
| 47. | } |
| 48. | |
| + 49. | |
| + 50. | |
| + 51. | |
| + 52. | |
| + 53. | |
| + 54. | |
| + 55. | |
| + 56. | |
| + 57. | |
| + 58. | |
| + 59. | |
| + 60. | |
| + 61. | |
| + 62. | |
| + 63. | |
| + 64. | |
| + 65. | |
| + 66. | |
| + 67. | |
| + 68. | |
Almost identical to the position functions. The getter just returns the values, while the setters either assign or add the given number of degrees to the object's orientation, and again finish by updating the entity's model matrix.
Next, let's take a look at what actually happens when we update the model matrix:
| 67. | return glm::vec3(rx, ry, rz); |
| 68. | } |
| 69. | |
| + 70. | |
| + 71. | |
| + 72. | |
| + 73. | |
| + 74. | |
| + 75. | |
| + 76. | |
| + 77. | |
| + 78. | |
| + 79. | |
| + 80. | |
| + 81. | |
| + 82. | |
| + 83. | |
| + 84. | |
| + 85. | |
| + 86. | |
To construct the model matrix, we first need to build both a translation and a rotation matrix.
Constructing the translation matrix is easy.
We make a call to glm::mat4(1.0f) which will give us an empty 4x4 matrix with 1 on the diagonal, a new identity matrix.
Then we just translate it into position with a call to glm::translate, passing in the matrix to be translated, and a translation vector of type glm::vec3.
Creating the rotation matrix takes a few more steps. We again start by creating a new 4x4 identity matrix.
First, as all our rotations are in degrees, we need to convert them to radians which is what GLM expects. So we multiply these variables by π and then divide by 180.
We then need to sequentially apply each rotation to the matrix. Remember, rotations in 3D are not commutative so the order we apply them is important. For Tait-Bryan angles, the rotation must first by applied to the Z-axis, then Y, then X. For this reason you'll often see Tait-Bryan angles described as "ZYX" rotations.
We can do this by using the function glm::rotate, which first expects to be passed an input matrix that the rotation will be applied to.
This is then followed by the angle to rotate the matrix by in radians.
The final parameter is then the axis in which the rotation should be applied.
This is passed again as a glm::vec3 corresponding to the X, Y, and Z axes.
So for the first rotation we apply, rzRadians, the rotation is applied around the Z-axis.
Multiplying the translation and rotation matrices together then gives us a transformation matrix which sequentially applies the rotations and then the translation. Remember, mathematically matrix multiplication goes from right to left. In effect, this new matrix will apply each of these transformations to any vertices, rotating them and then positioning them in our world - our model matrix!
With our model matrix calculated, we can move on to our draw functions.
First, let's provide a way for us to check whether drawing the entity is actually possible:
| 85. | modelMatrix = t * r; |
| 86. | } |
| 87. | |
| + 88. | |
| + 89. | |
| + 90. | |
| + 91. | |
| + 92. | |
| + 93. | |
| + 94. | |
| + 95. | |
| + 96. | |
Essentially we just need to test if either the model or texture pointers are null. If so, these haven't yet been set, so we return false, otherwise if both have been set we can return true.
Finally, we have the actual draw function itself:
| 95. | return true; |
| 96. | } |
| 97. | |
| + 98. | |
| + 99. | |
| + 100. | |
| + 101. | |
| + 102. | |
| + 103. | |
| + 104. | |
| + 105. | |
| + 106. | |
| + 107. | |
| + 108. | |
| + 109. | |
| + 110. | |
| + 111. | |
| + 112. | |
| + 113. | |
Our draw function starts by making sure that we actually have a valid model and texture with which to draw before doing anything. If these have not been set, the function simply returns, doing nothing.
If we have a model and texture, then we set the current texture unit to 0, and then bind the texture associated with the entity to that location. Likewise we bind the entity's model too.
We then make a call to glUniformMatrix4fv exactly as we done previously when drawing to set the model matrix, ensuring the model will be positioned correctly in our world.
We then call glDrawElements to actually perform the drawing, using the model's index count for the number of indices to draw.
That's essentially it! We just finish up the function by making sure that the model and texture are then unbound before returning.
Updating our Makefile
Let's not forget that as we've created a new source file, we need to tell the compiler about it when building our program:
| 1. | CC = g++ |
| 2. | |
| + 3. | |
| 4. | |
| 5. | LIBRARIES = -lSDL3 -lSDL3_image -lGL -lGLEW |
We append the new source code file, entity.cpp, to our OBJS variable containing all files that need to be compiled when building.
Don't forget, we only need to put the source code files here, not the header files!
Using Our Entities
With our new Entity class ready to go, let's create a few entities to go in our world.
To start off with, we need to include our new header file into our main.cpp:
| 1. | #include "shader.h" |
| 2. | #include "texture.h" |
| 3. | #include "model.h" |
| + 4. | |
With the class and it's functions now available to our main.cpp, we can create a few entities for our world:
| 36. | Shader mainShader; |
| 37. | Texture crateTexture; |
| 38. | Model crateModel; |
| + 39. | |
| 40. | |
| 41. | bool init() |
| 42. | { |
During initialisation, we can then set the properties of these entities:
| 126. | crateModel.setFilename("resources/crate/crate.obj"); |
| 127. | if(!crateModel.loadOBJModel()) |
| 128. | { |
| 129. | printf("Unable to load model: %s\n", crateModel.getError().c_str()); |
| 130. | return false; |
| 131. | } |
| 132. | |
| + 133. | |
| + 134. | |
| + 135. | |
| + 136. | |
| 137. | |
| 138. | ... |
After our models and textures have loaded, we can then pass in the address (&) of these objects to our first crate entity, which will be stored into the relevant pointers.
We can then optionally set a new position and rotation as well. In this case we position the crate a few units into the X axis, positioning it in front of the camera's starting position, and slightly to the left (positive Y axis). I've also added a very slight rotation in the Z axis.
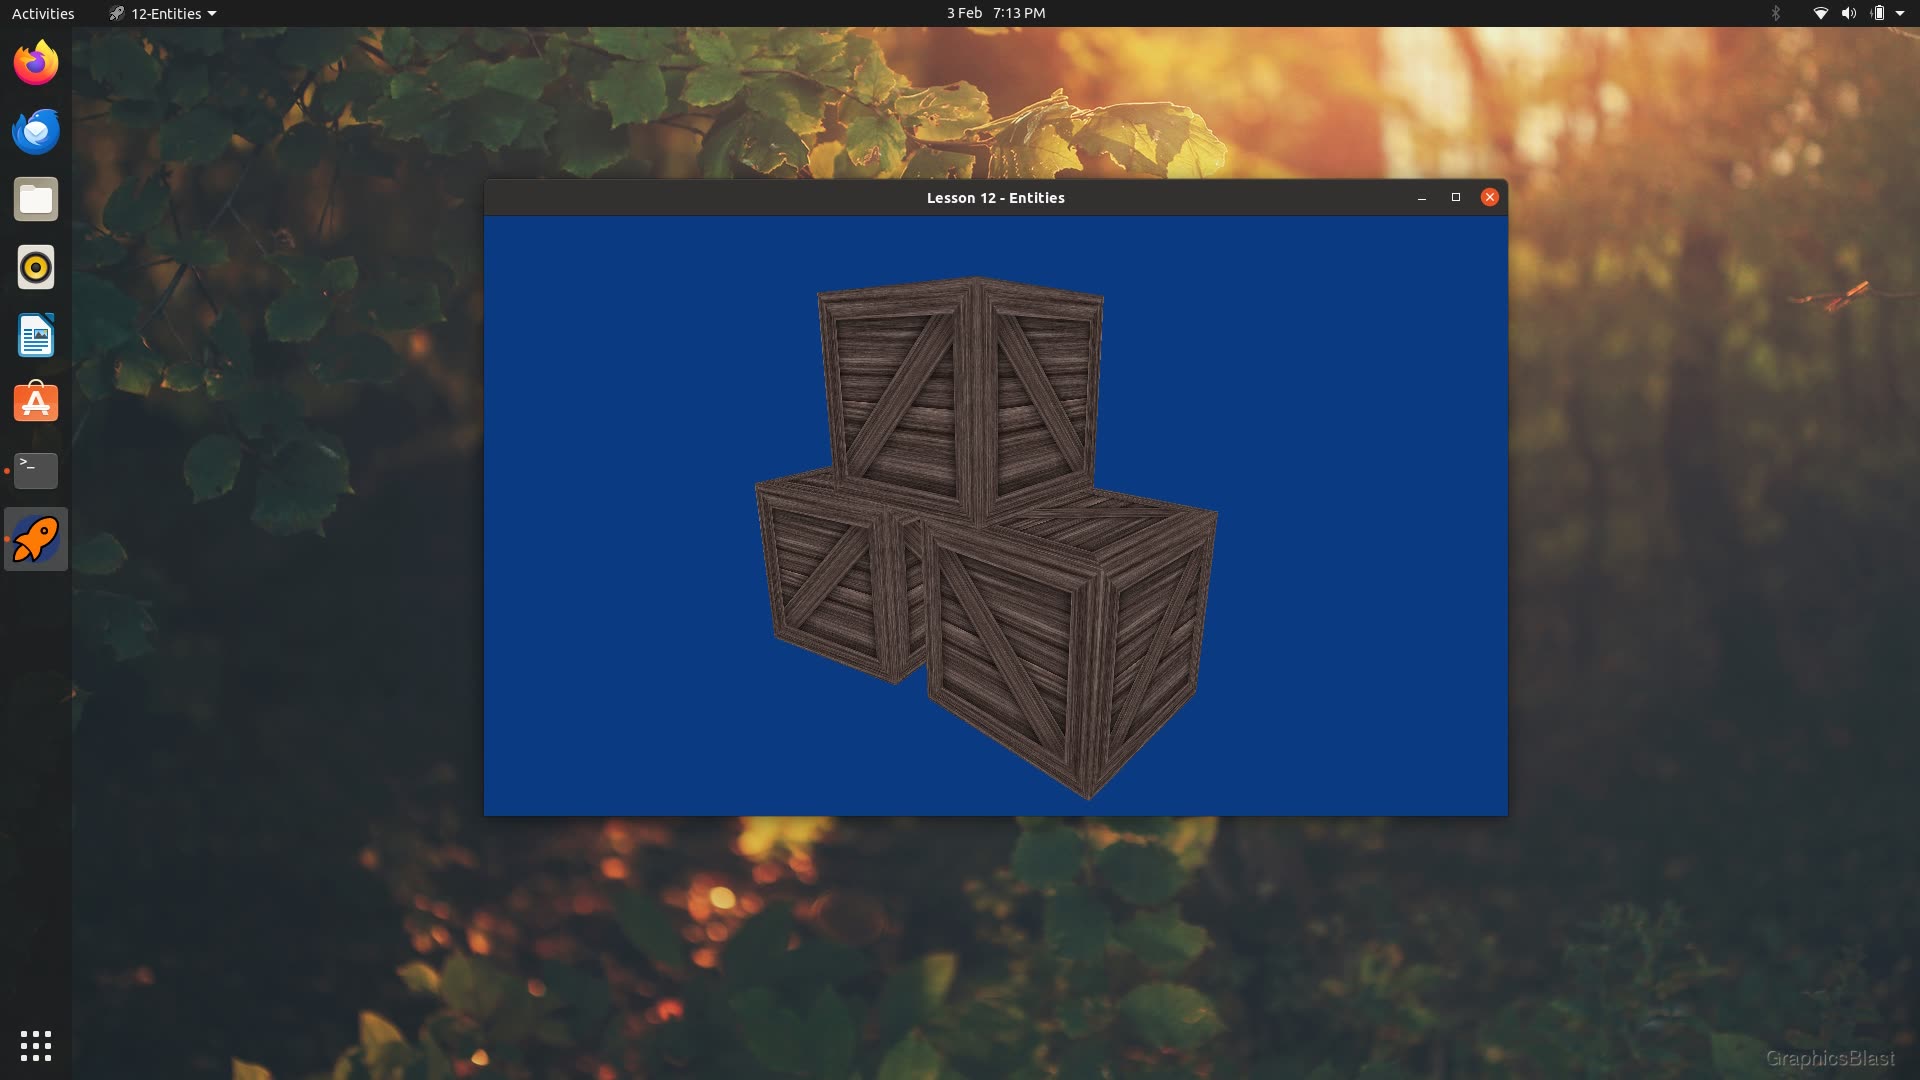
We can then set up the rest of our entities, reusing the model and texture data but this time positioning them slightly differently - in this case forming a stacked pyramid of crates:
| 133. | crate1.setModel(&crateModel); |
| 134. | crate1.setTexture(&crateTexture); |
| 135. | crate1.setPosition(6, 0.46, 0); |
| 136. | crate1.setOrientation(0, 0, 5); |
| 137. | |
| + 138. | |
| + 139. | |
| + 140. | |
| + 141. | |
| + 142. | |
| + 143. | |
| + 144. | |
| + 145. | |
| + 146. | |
| 147. | |
| 148. | SDL_SetWindowRelativeMouseMode(window, true); |
| 149. | |
| 150. | glClearColor(0.04f, 0.23f, 0.51f, 1.0f); |
For the second crate I've (almost) added an extra 90 degrees of rotation so a different side of the cube is facing the camera - just to make the scene a bit less monotonous and artificial.
With the entities now set up, we just need to update our draw code to call the draw function of our entities:
| 305. | mainShader.bind(); |
| 306. | |
| 307. | glUniformMatrix4fv(0, 1, GL_FALSE, glm::value_ptr(pMatrix)); |
| 308. | glUniformMatrix4fv(1, 1, GL_FALSE, glm::value_ptr(vMatrix)); |
| 309. | |
| + 310. | |
| + 311. | |
| + 312. | |
| 313. | |
| 314. | mainShader.unbind(); |
| 315. | |
| 316. | SDL_GL_SwapWindow(window); |
| 317. | } |
Previously, our main.cpp was directly creating a model matrix (mMatrix), and passing this to the shaders.
Of course, this is now being handled by the entities' draw functions, so we can remove it from our main draw function.
Likewise, all the model and texture binding is now being handled by the entities, so this code can also be removed from here.
Instead, this is all neatly replaced by simply telling each entity in turn to draw.
Conclusion
If you compile and run your program you should now be able to see a set of crates in front of you in your world.
Hopefully the benefits of this approach are clear!
By abstracting the models, textures, and entities, it becomes really easy for us to add in additional objects and position them within our world. Scaling up the size of our world by adding extra objects becomes just a matter of a few extra lines of code, and is reasonably efficient too! It even makes it quick and easy for us to apply a different texture to each crate should we wish to.
Our world-building process is now much more straight-forward.
In the next lesson we'll take this a step further and read a configuration file to define the properties of our entities and use this to construct a virtual scene. See you there!