
Lesson 12: Textures

The goal for this lesson is to add one of the most fundamental techniques in graphics rendering to our code: texture mapping. This is the process of taking an image and applying the colour data from it's pixels onto our triangles, rather than interpolating between three fixed colours from it's vertices like we've done up until now.
To do that, we'll start by explaining the theory behind texture mapping, and then look at coding it.
Like in Lesson 3 of this tutorial series, we'll use the SDL_Image library to handle the actual opening and decompression of the image files from disk, as it supports a huge number of common image file formats, and integrates nicely with SDL.
Texture Mapping
So let's have a look at what texture mapping actually is.
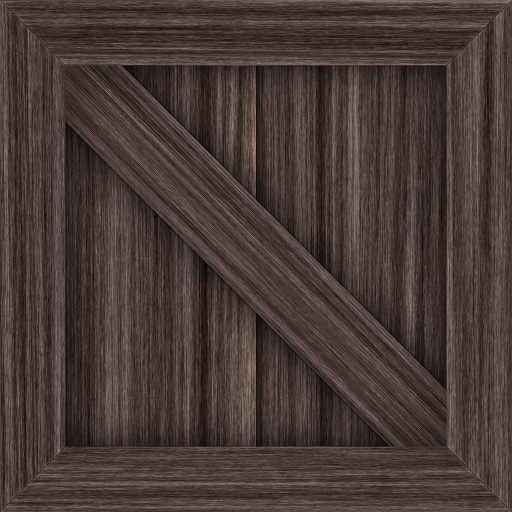
Let's suppose we want to draw this texture of a wooden crate onto our triangles.
Well previously when we performed a draw call we supplied OpenGL with a colour value for each vertex. As the GPU performed the draw call, it invoked the fragment shader on each pixel to be drawn in the final rendered image, and the shader interpolated the colour values from each vertex to set it's colour. The end result was a smooth colour gradient across the triangle.
The idea behind texture mapping is that we provide OpenGL with texture coordinates of our image just like we provided it with colour values. These coordinates simply show where the triangle's three vertices are positioned on the image.
When the fragment shader is invoked, instead of interpolating colours, it will instead interpolate these positions on the image. Then to render a given pixel, it will then take this interpolated coordinate and look up the colour of the image's pixels at that position, and set that as the shader's output.
Don't worry if you're struggling to picture that, I think just moving through the code is a nice way to see how it works.
So to implement this, we'll need to first read an image file and upload it into GPU memory. We'll then need to make sure that our triangles have a set of texture coordinates alongside the spatial coordinates and colour data we've used up until now. Once both of those are in place, rendering images on our triangles is then just a matter of updating our shader code to perform a lookup.
Texture Class
In the same manner as when we wrote our shader class, we're going to start by defining a texture class. Just like the shader class, it will be responsible for loading images from disk, uploading them into GPU memory, and binding and unbinding them.
The header file declaring the class, texture.h will therefore follow a very similar structure:
| + 1. | |
| + 2. | |
| + 3. | |
| + 4. | |
| + 5. | |
| + 6. | |
| + 7. | |
| + 8. | |
| + 9. | |
| + 10. | |
| + 11. | |
| + 12. | |
| + 13. | |
| + 14. | |
| + 15. | |
| + 16. | |
| + 17. | |
| + 18. | |
| + 19. | |
| + 20. | |
| + 21. | |
| + 22. | |
| + 23. | |
| + 24. | |
| + 25. | |
| + 26. | |
| + 27. | |
| + 28. | |
| + 29. | |
| + 30. | |
We start again with a Pragma Once to make sure we don't get redefinition warnings if the header is included from multiple files in our code. We then include GLEW as we'll need access to OpenGL types for storing a handle to the GPU buffer for the image, and then the string library for dealing with filenames and error messages.
The actual class definition starts off with a constructor which just as before won't do much except initialise our variables.
We then declare a function to set the image's filename that we'll read, a function to do the actual loading of the image, and then one for deleting the object when our program closes.
Just as with our shaders, I've separated setting the image's filename from actually doing the loading of the image just to make hot-reloading while the program is running easier.
Likewise the load function returns a bool indicating success, where should it return false to indicate a problem, an error message will be available from the getError function.
One difference from our shader class is that we now have a setParameter function.
This function is used to set OpenGL parameters about how the image is sampled when it is being rendered.
To give you a very quick idea of what we mean by sampling here, these parameters can be used to define what happens if we try to get the texture's colour between two pixels. Should we just grab the closest pixel's colour? Or should we smoothly combine the neighbouring pixels to figure out what the mid-way colour would be. So this function will allow us to specify these kinds of behaviours.
Note that there are certain situations and effects where we will need each of those sampling techniques, which we'll see later. So we'd rather have a convenient function in place now to allow us to choose this.
Anyway, like with our shader, we provide a bind and unbind function, and then a few other functions to get the raw texture handle, the filename from which it was loaded, and any error messages.
Our private variables are then used for storing these variables.
Texture class implementation
We can now start defining this class's functions in texture.cpp.
| + 1. | |
| + 2. | |
| + 3. | |
| + 4. | |
| + 5. | |
| + 6. | |
| + 7. | |
We start by including the texture header file we just wrote and also the header for the SDL_image library.
The constructor simply initialises the texture handle to a safe starting value.
Next up let's add the setFilename function:
| 6. | textureHandle = 0; |
| 7. | } |
| 8. | |
| + 9. | |
| + 10. | |
| + 11. | |
| + 12. | |
When setting the image's filename, we look up the executable's absolute path using SDL_GetBasePath(), and then append the local file path to it, ensuring we always have the correct absolute path to the filename passed in.
We've looked at this before in Lesson 3 but for anyone that's starting off with this lesson, this is for good reason! If a terminal starts a program, the terminal's current directory is used as the...current working directory! Which means relative paths are relative to the terminal and not the executable. This is problematic if the terminal is in one directory and runs the executable in another, so this approach solves all this in a cross-platform way.
Next up, we'll implement loading the image from disk and uploading it into a GPU buffer:
| 11. | filename = SDL_GetBasePath() + newTextureFilename; |
| 12. | } |
| 13. | |
| + 14. | |
| + 15. | |
| + 16. | |
| + 17. | |
| + 18. | |
| + 19. | |
| + 20. | |
| + 21. | |
| + 22. | |
| + 23. | |
| + 24. | |
Our function starts by calling the delete function to ensure that if this is called repeatedly, any previous data is correctly freed.
Out deleteTexture function will be safe to call at any time, so we don't need to worry about any issues deleting something that hasn't yet been created.
We then perform a quick sanity check to make sure that a filename has actually been set before proceeding.
We can then ask SDL_image to attempt to load the image:
| 21. | return false; |
| 22. | } |
| 23. | |
| + 24. | |
| + 25. | |
| + 26. | |
| + 27. | |
| + 28. | |
| + 29. | |
| + 30. | |
| 31. | |
| 32. | ... |
You've actually seen this code before when we loaded our window's logo.
We make a call to IMG_Load passing the absolute path to the image.
If the call succeeds then the image will be read into the system's RAM and decompressed.
We'll be returned a pointer to an SDL_Surface struct containing the image data and various other properties such as it's width and height.
If the image cannot be loaded, for example if the file doesn't exist or the particular image format is not understood, this pointer will instead be NULL, which we can then check for to indicate an error.
Now that we have the image decompressed and in system memory, we'll need to perform a bit of processing before we can push it into the GPU's memory.
When SDL loads an image, it will perform any decompression necessary in order to give us effectively an array of pixel values. However those pixels may contain simply RGB (red/green/blue) data if that's all the image had, or may contain RBGA data if an alpha channel was present. Each channel may have the standard 8 bits of data, but maybe not. The channels may be ordered RGB, but perhaps BGR. You get the idea.
Well a lot of the GPU APIs are designed to be extremely performant, and in order to do that they make certain assumptions about the data. So to avoid any potential penalties from our data being in an odd format, as soon as we load our images we'll convert them into RGBA format with 8 bits per channel, and 32 bits in total per pixel. This is an efficient layout for the GPU, and means for every image going forwards we can just assume it has this layout, rather than handling special edge cases.
Changing the format of images is not straight-forward because the change might require more memory that the original image had allocated (say a change from RGB -> RGBA). Therefore the most common way to do a conversion is to actually allocate a new surface with these exact specifications, and then ask SDL to blit the old surface into the new surface. Blit here just means to "copy" or "draw" one surface onto another. The underlying draw commands will realise if the two surfaces don't match in format and perform a conversion if needed. Our new surface will then contain the loaded image in a known, efficient, and consistent format.
To implement this the first thing we'll need to do is figure out how our bits should be laid out. While it might seem obvious that for an RGBA pixel, the red channel comes first, we have to consider the machine's endianness.
On a big-endian machine, the red channel will be represented by the first byte, but on the much more common little-endian based machines, the opposite is true. So let's perform a test to figure out how our bytes should be laid out on the user's machine:
| 29. | return false; |
| 30. | } |
| 31. | |
| + 32. | |
| + 33. | |
| + 34. | |
| + 35. | |
| + 36. | |
| + 37. | |
| + 38. | |
| + 39. | |
| + 40. | |
| + 41. | |
| + 42. | |
| + 43. | |
| + 44. | |
| + 45. | |
| + 46. | |
| 47. | |
| 48. | ... |
We set up a variable for each channel to hold a mask indicating where it's bits will be found in the pixel's 32 bits.
SDL provides a convenient way of testing the current machine's endianness.
If the machine is big endian, the we set the red channel mask to the hexadecimal value of 0xff000000.
We can interpret this value as the first 8 bits will be set to 1 ("ff"), while the rest of the mask is set to zero.
We're effectively using this to symbolise that red will be found at the start.
We then set the green mask to 1's for the second set of 8 bits, then blue gets the next two, and the alpha mask is 1 for the final set of bits.
If the machine is little endian, we simply reverse the order of these masks.
Now we have a very exact way of specifying what our desired image format will look like:
- There are 32 bits per pixel
- There are 8 bits per channel
- An Alpha channel will be present (RGBA)
- The red channel will be in the most significant byte, regardless of endianness
Great, now we can ask SDL for a surface with these properties:
| 45. | amask = 0xff000000; |
| 46. | } |
| 47. | |
| + 48. | |
| + 49. | |
| + 50. | |
| + 51. | |
| + 52. | |
| + 53. | |
| + 54. | |
| 55. | |
| 56. | ... |
We ask SDL to create a new surface called surfaceRGBA.
This function expects to be given a width, height and pixel format to generate a surface.
We pass in the original image's width and height, and then for the pixel layout we pass in the result of the function SDL_GetPixelFormatForMasks.
For this function, we specify a pixel format of 32 bits as well as the masks for each channel.
If this call succeeds, we'll have an uninitialised image with these properties.
If not, the pointer will be NULL so we will free the original image we loaded's data with a call to SDL_DestroySurface and return.
If the call succeeded, we can blit the original image to this surface and it will be converted to the new format if required.
| 53. | return false; |
| 54. | } |
| 55. | |
| + 56. | |
| + 57. | |
| + 58. | |
| + 59. | |
| + 60. | |
| + 61. | |
| + 62. | |
| 63. | |
| 64. | ... |
The call to SDL_BlitSurface expects the source image, where we pass in the original texture, followed by a bounding box for which part of the image we want to copy.
SDL allows us to pass in NULL as the bounding box if we just want the whole image copied.
Then we pass in the destination, our new surface, as well as NULL again as the destination's bounding box, indicating the whole image can be blitted to.
If this call fails, we now need to remember to destroy both surfaces we created before returning.
Finally, there is one more thing we must do to get our images into a common format before working with them. In most desktop computer systems, the origin of a window or image is in the top-left corner, with the x-axis extending to the right, and the y-axis extending downwards.
If you remember back when we plotted the coordinates for our first triangle though, OpenGL uses a mathematically inspired system where the origin is in the bottom-left, with the x-axis going right and the y-axis going upwards.
This misalignment therefore needs to be accounted for, with the most common approach being to simply flip the image in the y-axis as it's loaded. There are other ways to solve this such as using inverted UV coordinates, but these are generally frowned upon as they mean breaking the consistency of OpenGL's coordinate system, and we really don't want to do that. So by far the most common approach is to simply flip the image, for which SDL has us covered here too:
| 61. | return false; |
| 62. | } |
| 63. | |
| + 64. | |
| + 65. | |
| + 66. | |
| + 67. | |
| + 68. | |
| + 69. | |
| + 70. | |
| 71. | |
| 72. | ... |
We make a call to SDL_FlipSurface passing in our converted image and a flag to tell SDL we need it to be flipped vertically, and the function flips the image in place.
Again the image will return false if there is a problem, and we go through our steps of clearing up and returning.
That's all for our image preprocessing, we can now generate a buffer on the GPU for the image and upload it there:
| 69. | return false; |
| 70. | } |
| 71. | |
| + 72. | |
| + 73. | |
| + 74. | |
| + 75. | |
| 76. | |
| 77. | ... |
The order of these calls is very similar to what we've used before for generating other buffers.
First a call to glGenTextures, telling OpenGL we need one buffer and pass in the object's handle, which will now be pointing at the newly allocated buffer.
We then make a call to glBindTexture to bind this buffer, specifying that it is a GL_TEXTURE_2D or 2D texture.
Other kinds of texture do exist, so there is some logic there.
With the handle bound, any texture based functions we call will now apply to this texture buffer.
We then call glTexImage2D to actually copy our image into the GPU texture buffer.
We start again by specifying again that it is a 2D image.
The second parameter we pass refers to the mipmapping level in use, which as we're not currently using mipmapping (until a later lesson!) we just keep to the default level, 0.
Next, we need to pass the pixel format that the GPU texture will use. As we're now certain our image data is in the RGBA8 (8 bits per channel) format, we can tell OpenGL to continue using this on the GPU so no conversions are needed. We then set the GPU's texture to have the same width and height as our image.
Next up we have a bit of legacy API. The next value is used to specify if our image has a border around it. We don't so we pass zero here, and in fact this capability is now completely deprecated and must be set to zero.
We then pass our SDL surface's pixel format, represented by GL_RGBA, and the underlying data type of our pixels, which SDL stores as just unsigned bytes.
Finally, we pass in the actual image pixels, which will now be copied across into the GPU memory, ready for our shaders to access!
Let's finish up our load image function:
| 75. | glTexImage2D(GL_TEXTURE_2D, 0, GL_RGBA8, surfaceRGBA->w, surfaceRGBA->h, 0, GL_RGBA, GL_UNSIGNED_BYTE, surfaceRGBA->pixels); |
| 76. | |
| + 77. | |
| + 78. | |
| + 79. | |
| + 80. | |
| + 81. | |
| + 82. | |
| + 83. | |
| + 84. | |
| + 85. | |
| + 86. | |
With the image now on the GPU, we must specify some sampling parameters before it can be used.
We first set the minification filter parameter, which controls how we sample pixels if we're trying to draw an image to a much smaller number of pixels on screen, and the magnification filter which controls how we sample if we draw the pixel to a much larger area.
For both of these, we specify GL_NEAREST.
We'll look at this setting in detail in the next lesson on texture filtering, but essentially this controls what happens when a fragment shader wants to lookup the colour of some part of the texture, but it provides a UV coordinate which does not neatly align to the centre of a pixel of the texture.
This parameter, GL_NEAREST, tells OpenGL just to find the closest pixel, and use it's value, but again we'll look at this more closely next lesson.
We then finish our function by deleting the two SDL surfaces as all the necessary data has been copied onto the GPU, and then unbinding the GPU texture now that we're finished with it. Then we can return true to indicate success.
Great, that's the hard part of this lesson done.
Now let's complete the last few functions of the class, starting with deleteTexture:
| 85. | return true; |
| 86. | } |
| 87. | |
| + 88. | |
| + 89. | |
| + 90. | |
| + 91. | |
| + 92. | |
| + 93. | |
To delete all the texture's data on the GPU, we make a call to glDeleteTextures passing in an array of buffers and the length of the array.
As we only have a single buffer we pass 1 for the size and then the address of the texture buffer.
Internally, this function will unbind the buffer if it is currently bound, so we don't need to worry about that, and also it's safe to call this function on a texture handle value of 0, which will just do nothing. Therefore it's safe to call this function repeatedly, or call it before a texture has been loaded, so is quite safe.
We then round up this function by re-setting the texture handle back to zero and resetting the error message variable.
Now let's have a look at the setParameter function:
| 92. | errorMessage = ""; |
| 93. | } |
| 94. | |
| + 95. | |
| + 96. | |
| + 97. | |
| + 98. | |
| + 99. | |
| + 100. | |
This function's goal is to allow us to easily set the parameters of the texture like how sampling should be done.
If you're curious about what possible parameters there are, there is a list here. But the list isn't very long or exciting, and we'll cover everything important in upcoming lessons.
The function itself is pretty simple. To make changes to the texture's parameters, it first needs to be bound so that any future function calls apply to it. Therefore the function begins by binding and ends with unbinding the texture.
The function takes an enum indicating which property of the texture should be changed, and then a new value for that property.
This is then applied to the currently bound texture using the glTexParameteri function.
Again we need to pass GL_TEXTURE_2D to this function to tell OpenGL that it's working with 2D textures.
Note that this function is kind of optional, but I've decided to implement it.
We could just bind the texture using the bind() function from outside, and then directly make a call to glTexParameteri.
But I've decided just to abstract it so we can ensure the texture is bound properly.
Next, let's actually code the bind and unbind functions:
| 99. | unbind(); |
| 100. | } |
| 101. | |
| + 102. | |
| + 103. | |
| + 104. | |
| + 105. | |
| + 106. | |
| + 107. | |
| + 108. | |
| + 109. | |
| + 110. | |
Again these are fairly close to what we did when we implemented the shader class.
To make this texture the "current" texture OpenGL is working with, we make a call to glBindTexture, tell OpenGL that we're binding a 2D texture, and passing it the texture handle.
To unbind the texture, we make the exact same call but pass zero instead of a texture handle.
This works nicely because we made sure that if our texture is not properly initialised, the textureHandle will be zero, so this function is safe to call even on uninitialised textures.
With that in place the last functions of the class we need to implement are the getter functions for the variables:
| 109. | glBindTexture(GL_TEXTURE_2D, 0); |
| 110. | } |
| 111. | |
| + 112. | |
| + 113. | |
| + 114. | |
| + 115. | |
| + 116. | |
| + 117. | |
| + 118. | |
| + 119. | |
| + 120. | |
| + 121. | |
| + 122. | |
| + 123. | |
| + 124. | |
| + 125. | |
Nothing surprising here, we just return the corresponding variable for each function!
Updating our Makefile
We've added a source code file so of course we need to add it to our Makefile so it gets compiled as well:
| 1. | CC = g++ |
| 2. | |
| + 3. | |
| 4. | |
| 5. | LIBRARIES = -lSDL3 -lSDL3_image -lGL -lGLEW |
We just need to add the source filename to the OBJS variable, we don't need to add the header file!
Integrating our new class
While we've updated our Makefile to compile the new code, the header will need to be included in our main.cpp to understand that class declaration.
So the first step to using our new class is to include this:
| 1. | #include "shader.h" |
| + 2. | |
| 3. | |
| 4. | #include <SDL3/SDL.h> |
| 5. | #include <SDL3/SDL_main.h> |
| 6. | #include <SDL3_image/SDL_image.h> |
| 7. | #include <GL/glew.h> |
| 8. | #include <glm/glm.hpp> |
| 9. | #include <glm/gtc/type_ptr.hpp> |
We can then create an instance of our texture class:
| 28. | float x = 0; |
| 29. | float y = 0; |
| 30. | float z = 0; |
| 31. | float pitch = 0; |
| 32. | float yaw = 0; |
| 33. | |
| 34. | Shader mainShader; |
| + 35. | |
| 36. | |
| 37. | GLuint vao; |
While the class will take care of loading an image to the GPU, we still need to update our existing geometry to add the texture coordinates to make use of it. To do this we'll add a new Vertex Buffer Object which we'll use to store the texture coordinates in:
| 34. | Shader mainShader; |
| 35. | Texture crateTexture; |
| 36. | |
| 37. | GLuint vao; |
| + 38. | |
| 39. | |
| 40. | bool init() |
| 41. | { |
We increase the size of our VBO array from holding 3 items (coordinates, colours, and indices) to 4.
We can now move on to our init function.
On start up we'll make the necessary calls to our texture class to load an image, and then allocate an extra buffer and pass in some texture coordinates there so they will be available to our shaders.
Immediately after we load our shader in our code, we make a similar call to then load in our texture:
| 110. | mainShader.setFilenames("shaders/main_vertex.glsl", "shaders/main_fragment.glsl"); |
| 111. | if(!mainShader.loadShader()) |
| 112. | { |
| 113. | printf("Unable to create shader from files: %s\n", mainShader.getFilenames().c_str()); |
| 114. | printf("Error message: %s\n", mainShader.getError().c_str()); |
| 115. | return false; |
| 116. | } |
| 117. | |
| + 118. | |
| + 119. | |
| + 120. | |
| + 121. | |
| + 122. | |
| + 123. | |
| 124. | |
| 125. | GLfloat vertices[] = |
| 126. | { |
We start by setting the filename. Once that's done we can then attempt to load it. Just like the shader, if this step fails then we display the error message and cancel initialisation, else our code will continue.
We can then start defining our texture coordinates of our geometry, just as we set up the colours and spatial coordinates:
| 133. | GLfloat colours[] = |
| 134. | { |
| 135. | 1.0, 0.48, 0.02, |
| 136. | 1.0, 0.48, 0.02, |
| 137. | 1.0, 0.97, 0.02, |
| 138. | 1.0, 0.02, 0.05, |
| 139. | }; |
| 140. | |
| + 141. | |
| + 142. | |
| + 143. | |
| + 144. | |
| + 145. | |
| + 146. | |
| + 147. | |
| 148. | |
| 149. | GLuint indices[] = {0, 1, 2, 0, 2, 3}; |
We code an array of floats, where each line represents a texture coordinate. The first line contains the texture coordinate for the first vertex, and also corresponds with the first line of the colours array and the first line of the vertices coordinates.
The first vertex coordinate in the array we coded was the bottom-left as we look at it from the origin, so I've set the texture coordinate for this vertex to (0, 0). I've then set these coordinates to increase in the x-axis running to the right side of the screen, and the y-axis going upwards. As this matches how images are laid out in OpenGL, the image will appear "the right way up" to us as we look at our triangles/square from the origin.
To push these coordinates to the GPU we need to remember to generate an additional buffer to push the data to:
| 151. | glGenVertexArrays(1, &vao); |
| 152. | glBindVertexArray(vao); |
| 153. | |
| + 154. | |
| 155. | |
| 156. | glBindBuffer(GL_ARRAY_BUFFER, vbo[0]); |
So we change the number of buffers generated from 3 to 4.
We'll then do exactly what we did to push the vertex coordinates and colours to the new GPU buffer we just generated:
| 165. | glEnableVertexAttribArray(1); |
| 166. | glVertexAttribPointer(1, 3, GL_FLOAT, GL_FALSE, 0, 0); |
| 167. | |
| + 168. | |
| + 169. | |
| + 170. | |
| + 171. | |
| + 172. | |
We start by binding the new buffer. To keep some kind of structure within our code, I've inserted it as buffer index 2, so the first 3 buffers (0, 1, 2) are all for the vertices, and then the last (index 3) is used for the Index Buffer Object. This is my choice though, there's not a requirement for the Index buffer to be the last one!
Once the new VBO is bound, we then make a call to glBufferData to set the buffer data for the bound buffer.
Just like with the vertices and colours, I pass in the constant GL_ARRAY_BUFFER to tell OpenGL I'm passing in an array, then the size of the array, the array itself, and the flag GL_STATIC_DRAW to indicate it won't be modified often which helps the GPU optimise it's memory.
The data will then be copied over to the GPU buffer.
We then make calls to glEnableVertexAttribArray and glVertexAttribPointer again to tell OpenGL how to read this data.
Specifically, the first indicating that the data going to location 2 is an array that varies per vertex (rather than a the exact same data going to each vertex).
The second function then specifies that location 2 should pass 2 floats to each vertex.
The final 3 parameters here then specify that the data shouldn't be normalised, has no stride (is tightly packed), and starts from the beginning of the array.
Because we've inserted the texture coordinates into the second index of the VBO array, we need to update the IBO to then use index 3:
| 171. | glEnableVertexAttribArray(2); |
| 172. | glVertexAttribPointer(2, 2, GL_FLOAT, GL_FALSE, 0, 0); |
| 173. | |
| + 174. | |
| 175. | glBufferData(GL_ELEMENT_ARRAY_BUFFER, sizeof(indices), indices, GL_STATIC_DRAW); |
That's actually all we need to change for our IBO!
As we've allocated memory on the GPU, the next thing in our minds should be to think about freeing that memory at the end of our program:
| 190. | void close() |
| 191. | { |
| 192. | glDeleteVertexArrays(1, &vao); |
| + 193. | |
| 194. | |
| + 195. | |
| 196. | mainShader.deleteShader(); |
| 197. | |
| 198. | SDL_GL_DestroyContext(context); |
| 199. | SDL_DestroyWindow(window); |
| 200. | SDL_Quit(); |
| 201. | } |
The first change is that we tell OpenGL that the VBO array has 4 buffers in it which now need to be deleted.
The second change is then to call our textures delete function, which will make sure that it's texture memory is freed.
With the texture loaded and deleted, we can then quickly add in hot-reloading:
| 247. | else if(event.key.key == SDLK_R) |
| 248. | { |
| 249. | if(!mainShader.loadShader()) |
| 250. | { |
| 251. | printf("Unable to create shader from files: %s\n", mainShader.getFilenames().c_str()); |
| 252. | printf("Error message: %s\n", mainShader.getError().c_str()); |
| 253. | programRunning = false; |
| 254. | } |
| + 255. | |
| + 256. | |
| + 257. | |
| + 258. | |
| + 259. | |
| 260. | } |
| 261. | else if(event.key.key == SDLK_T) |
Where we previously implemented hot-reloading for the shaders when the "r" key is pressed, we can extend this function to also make a call to (re-)load the texture while the program is running.
When we implemented the load function, the first thing we did was make it call the texture's delete function, so the old texture will be removed properly. It will then attempt to load the same image from disk again, so you can quickly adjust the image file while the program is running and prototype different looks to your world!
Like with the shaders, if this fails all we can do is show an error message and close the program, but if it worked the image will be ready for our next draw call.
Great, almost there! Now we'll update our draw function:
| 333. | mainShader.bind(); |
| 334. | |
| 335. | glUniformMatrix4fv(0, 1, GL_FALSE, glm::value_ptr(pMatrix)); |
| 336. | glUniformMatrix4fv(1, 1, GL_FALSE, glm::value_ptr(vMatrix)); |
| 337. | |
| + 338. | |
| + 339. | |
| 340. | |
| 341. | glBindVertexArray(vao); |
The idea here is that just as the Vertex Buffer Objects are assigned locations from which the shader code can access the data in them, textures are passed to the shader and accessed in much the same way.
We make a call to glActiveTexture effectively saying that we're now modifying the texture in location zero (GL_TEXTURE0), and what ever is bound or set afterwards will be accessible to the shaders from texture location zero.
So that's what we do, set the location slot that we're actively using to zero, and then call our texture class's bind function. The texture is now bound to location zero.
That's pretty much it to get the texture into the shader, let's just perform the unbinding as well when we're finished before before looking at the shaders:
| 347. | glDrawElements(GL_TRIANGLES, 6, GL_UNSIGNED_INT, 0); |
| 348. | |
| 349. | glBindVertexArray(0); |
| 350. | |
| + 351. | |
| 352. | |
| 353. | mainShader.unbind(); |
At the end of our draw call as texture location zero is still the active location, we can just make an unbind call to our texture object to reset the state and we're done!
Texture shading
Next we'll look at updating our shader code. We'll begin by looking at the vertex shader as that comes first in the GPU pipeline.
We've passed each vertex shader two floats to act as the vertex's shader coordinates, which we can read in as a vec2.
All we'll do here in the vertex shader is simply pass the texture coordinates through, in order to make sure they're accessible later on in the pipeline in the fragment shader.
So all we'll do here is set up an input variable to read the texture coordinates into, set up a new output variable, and pass the data through:
| 7. | layout(location = 0) in vec3 aPosition; |
| 8. | layout(location = 1) in vec3 aColour; |
| + 9. | |
| 10. | |
| 11. | out vec3 colour; |
| + 12. | |
| 13. | |
| 14. | void main() |
| 15. | { |
| 16. | colour = aColour; |
| + 17. | |
| 18. | gl_Position = uPMatrix * uVMatrix * uMMatrix * vec4(aPosition, 1.0); |
| 19. | } |
We know in location 2 we've passed two floats in per vertex, so we read them into a vec2 named aTextureCoordinate.
We set up a new output variable called textureCoordinate, again a vec2.
Note the lack of the "a" prefix!
Then in the actual main function, we just pass the data through, assigning the value of the input to the output. This will make the data available to the fragment shader, and just like with the colour variable, a given fragment will interpolate between each vertex to determine exactly what value it receives.
Now let's look at the fragment shader - the last piece of the puzzle.
We'll start by reading in the texture from texture location zero:
| 1. | #version 460 |
| 2. | |
| + 3. | |
| 4. | |
| 5. | in vec3 colour; |
The notation for reading from location zero is the same as we use in the vertex shader.
So we read from texture location zero (well, we use the term "binding" as we didn't push data there directly, but instead bound a GPU resource to it...).
The variable is marked as a uniform which again indicates that this variable will be identical for every single pixel we're drawing (unlike the texture coordinates themselves), and again we prefix the variable name uTexture with a "u" to denote this.
You may have noticed that the data type for the variable is not a "texture", but a sampler2D.
There is a slight difference, with sampler implying that if we read from it, it's actually sampled from the texture.
So we can happily attempt to read from halfway between two pixels and the result we'll get will be valid and set according to the sampler values we defined earlier.
We'll then read in our texture coordinate from the vertex shader:
| 1. | #version 460 |
| 2. | |
| 3. | layout(binding = 0) uniform sampler2D uTexture; |
| 4. | |
| 5. | in vec3 colour; |
| + 6. | |
| 7. | |
| 8. | out vec4 fragment; |
We read these in as a vec2. As the texture coordinates are interpolated across the triangle for each triangle we're rendering, we don't actually need to do anything else. The coordinates will already be correct for any pixel!
Because of this, we can just grab the texture's pixel colour at the texture coordinate we've been passed and set that as the fragment shader output, and that's it!
| 8. | out vec4 fragment; |
| 9. | |
| 10. | void main() |
| 11. | { |
| + 12. | |
| 13. | } |
The built-in function texture takes an image and a set of texture coordinates and returns us that pixel's colour.
As we defined the image specifically as 2D when we set it up, the function already expects a vec2 type as the texture coordinate, and as we set up the image as RGBA, the returned value will be a vec4, just as the shader's output expects.
And with that we're finished. Don't forget to make sure you have an actual image in your resources folder, and with that you can compile and run your program and you should now see your image drawn on the triangles!
Note that if we attempt to sample a texture which does not exist or is otherwise not in a valid state, the sampler will just return zeroes. In our code, that will result in the two triangles just appearing black. So if you see this in your program, it's a hint that you made a mistake somewhere while loading the texture.
Shader effects
Just before we finish up this lesson, I just want to show you a few more things in the shader code. We're just at the point where our previously dumb shaders are starting to be able to do some interesting things.
After all this effort to get an image on screen, let's quickly have a look at what we can do.
First of all, what if we just render our texture coordinates as colours?
| 10. | void main() |
| 11. | { |
| + 12. | |
| 13. | } |
In our fragment shader we can convert the vec2 texture coordinate variable to a vec4 RGBA value and set that as the pixel's colour.
GLSL is quite flexible like this - it understands that we're passing a vec2 along with two more hard-coded floats as the input parameters, and to create a vec4 it needs 4 floats. So this is a perfectly legitimate way to initialise variables.
The red and green channels will now display to us our texture coordinate variable, while the blue channel will be fixed to 0 and the alpha to 1. This is actually a super useful way of visually debugging our shaders, as quite quickly we can reason that the rendered output makes sense:
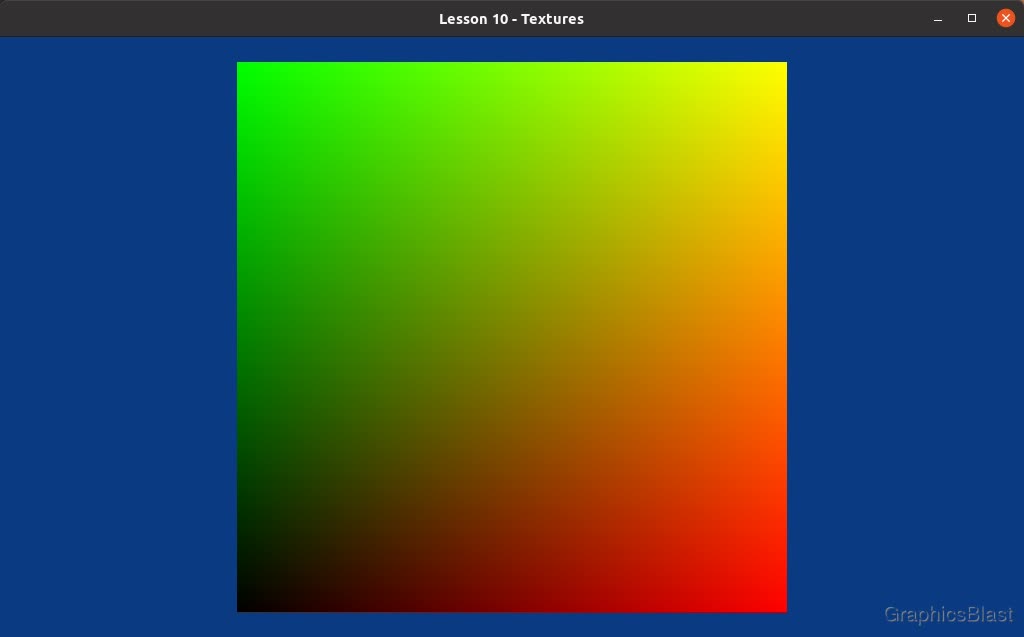
Where these colours are caused by:
- The bottom-left corner is black because it has texture coordinate (0, 0) so RGBA(0, 0, 0, 1).
- The bottom-right corner is red because it has texture coordinate (1, 0) so RGBA(1, 0, 0, 1).
- The top-left corner is green because it has texture coordinate (0, 1) so RGBA(0, 1, 0, 1).
- The top-right corner is yellow because it has texture coordinate (1, 1) so RGBA(1, 1, 0, 1).
It's fun to play around with the fragment shader now that we have something sort-of usable there. Remember, we've implemented hot-reloading shaders so you can freely update the fragment shader file and just hit "r" on the window to see the results!
Another easy effect is for us to take the crate texture and mix it with the colour values we were using before we started this lesson:
| 10. | void main() |
| 11. | { |
| + 12. | |
| + 13. | |
| + 14. | |
| + 15. | |
| 16. | } |
Which gives us:
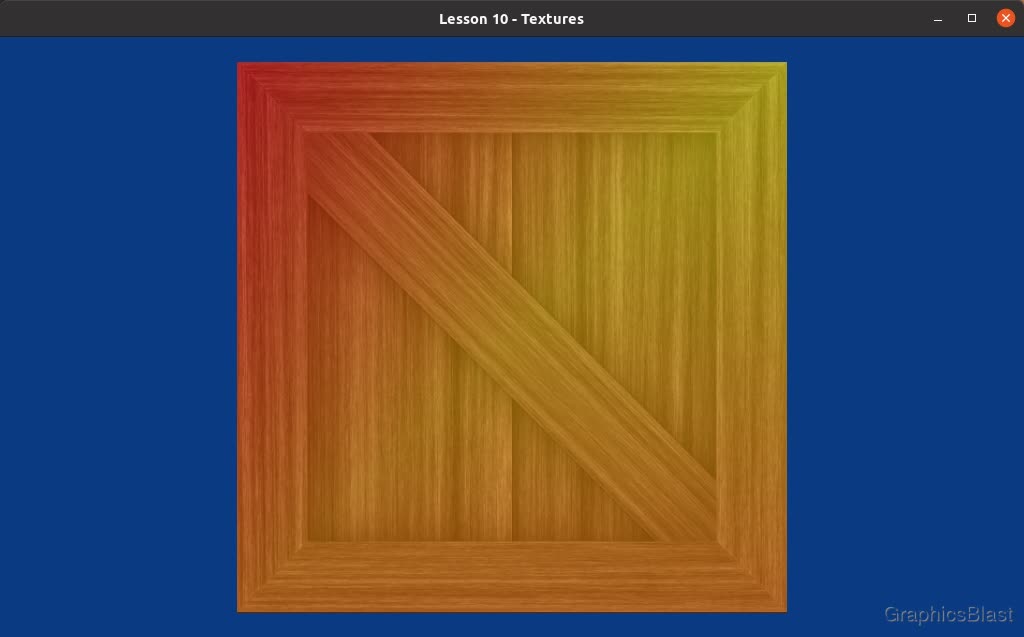
It's not a practical effect exactly, but I think it's nice practice and starts to hint at the power of GPU shader programming.
What we did here was apply the GLSL mix function, which takes two colours and blends them together.
The third parameter is then just how much influence each input will have on the resulting output, where 0.5 means that the output is a 50-50 blend of each of the two inputs (0 would just give us the first colour, and 1 would only be the second).
Anyway that's all for now. I'm reverting my shader code back to the regular crate texture without any blending effects before starting the next lesson on texture sampling. See you there!