
Lesson 4: The GPU Rendering Pipeline
Now we've learned the basics of working with a window, we can begin thinking about rendering graphics to it!
Before we start coding though, I want to have a lesson here to quickly explain how a GPU works, and what it actually does when we render something. This means that when we start doing things like writing shaders in the next lesson, you'll understand the context in which they're being used, what's going on, and what they're trying to achieve.
Initialisation
Before any programs actually start doing any modern graphics rendering, they first try to make sure that any data they might need is present in the GPU's memory beforehand if possible.
This way when they want to start rendering frames extremely quickly, everything is ready to go on the device. The draw instructions the CPU sends to the GPU simply become "draw the model in buffer x using the texture in buffer y". The GPU will already have these buffers ready, and so these draw calls can be performed very quickly.
This is much faster than the APIs of old, where typically you would tell the GPU every frame to draw a vertex at this coordinate, and another vertex over here, etc. Lots of data was being passed between devices every frame which slowed everything down.
NOTE:
You can actually still find a surprising number of lessons online utilising these old techniques.
They've been obsolete for about 20 years now, but some people prefer them as they can be easier to implement.
This does come with a massive performance penalty though!
As an example, if you find OpenGL code from before version 3 (released in 2006, so truly ancient by technology standards), the draw function will start with a call to glBegin, followed by specifying lots of data like the vertex positions manually, then finish with a call to glEnd.
There's a huge overhead to sending all this data to the GPU, and it happened every frame!
Anyway, once our data is prepared in GPU memory, we can then look at rendering our triangles.
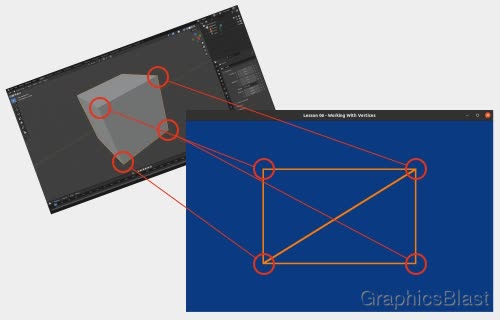
Remember, triangles are used to draw everything in 3D, whether it is putting two next to each other to form a square, or drawing millions to form a complex 3D model of a person; it's always triangles! This is because they are the simplest shape to have an internal area, and therefore can be combined to form any other shape (or approximate it in the case or circles, curves, etc.). Meanwhile support for directly rendering squares, pentagons, or any other shapes with more than 3 vertices would just add hardware and software complexity to what can already be achieved using triangles anyway.
The rendering pipeline
With our data prepared in the GPU's memory, we can now look at how rendering is done. There are 3 key stages to consider.
1. The vertex shader
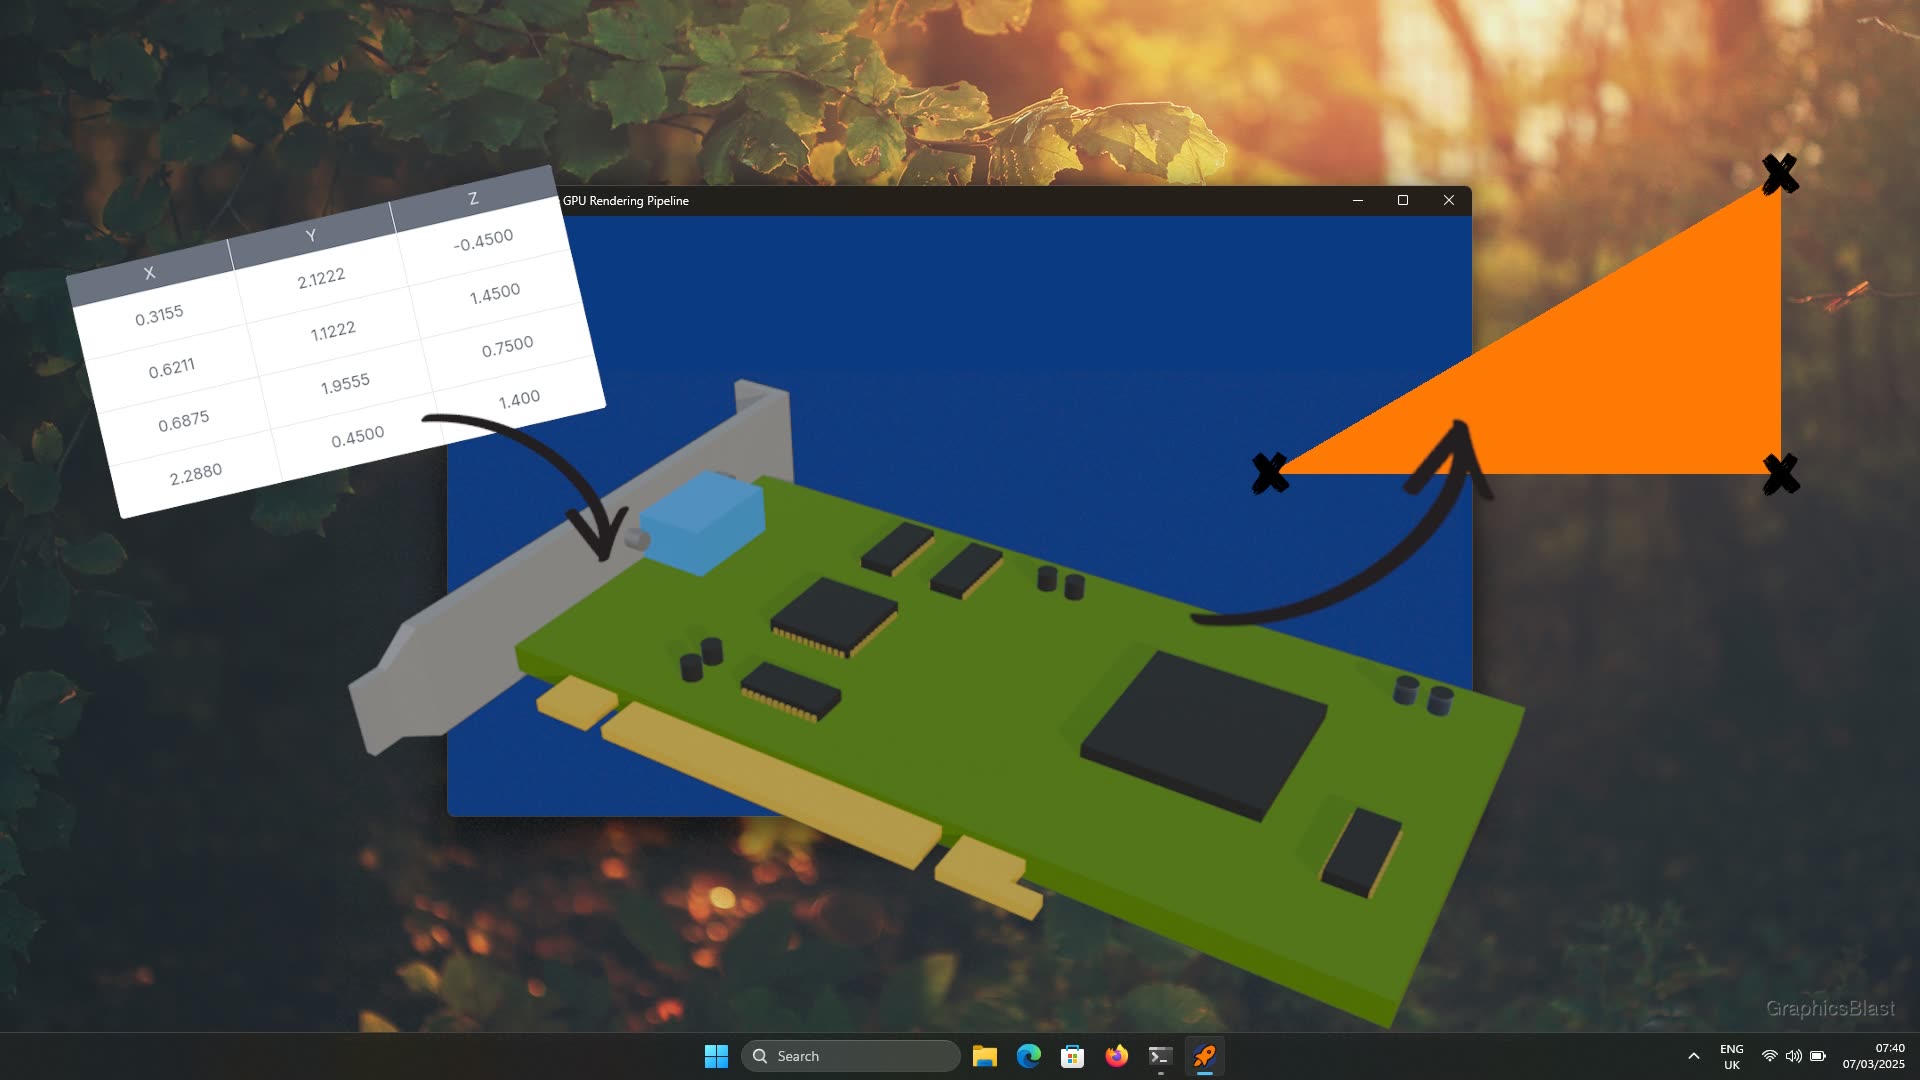
The first stage is known as the vertex shader. It takes the 3D coordinates of all the triangles in our models and meshes, and figures out where on the window they should be drawn. We can therefore loosely think of the vertex shader as something that "flattens" all our 3D coordinates onto our 2D window.
A 3D scene usually uses the concept of a virtual camera to figure out which parts of a 3D world should be visible at any given moment. The idea is therefore that the vertex shader should figure out given the camera's position in the world, where a given mesh in the world should lie on the window. If the mesh cannot be seen by the camera, then it will not lie within the window's coordinate system. This process needs to take into account how the scene's camera is positioned relative to the triangles, the camera's "lens" parameters, any parallax effects, etc.
This process is applied to every vertex that we draw, and for every vertex we feed in to our vertex shader stage, we expect one vertex out.
2. Rasterisation
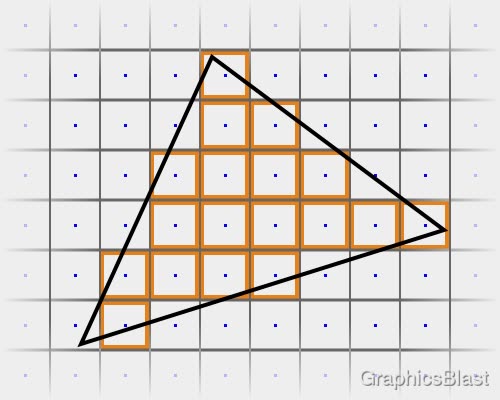
The second stage of the GPU rendering process takes these triangles, now laying on the window's coordinate system, and calculates which pixels they occupy. This is a process known as rasterisation.
Once the vertex shader has been run to position a triangle on our screen, the output is still just a set of coordinates for each vertex. But in order to draw the triangle we need to know which pixels to colour in. So rasterisation is exactly this, figuring out which pixels are enclosed by a given triangle.
A simple (although inefficient) way to do this would be to loop over every pixel in the window, and perform a test to see if the pixel's centre lies inside the triangle. If yes, we need to draw it, else we leave it untouched.
The output of this stage is then a collection of pixels belonging to the triangle being rendered.
3. The fragment shader
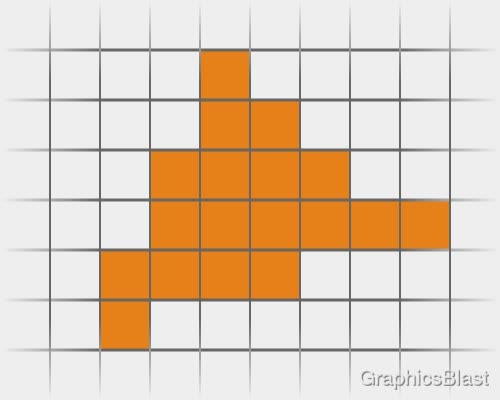
The final step is then to take each of these pixels and decide what colour to set each of them to. This is done using something called a fragment shader (sometimes also called a pixel shader).
The fragment shader is a small program which is executed on every pixel outputted from the rasterisation step individually. So if the GPU rasterises a triangle and it occupies 5 pixels on the screen, 5 fragment shader programs will be executed (in parallel) for each of these pixels.
As an example, in the next lesson our fragment shader will set the pixel's colour to a fixed value (orange), really the most trivial kind of fragment shader possible. More advanced programs though can look up information about the triangle, look up textures, figure out where any lights in the scene are, and combine all this information to set the pixel's colour in a much more sophisticated way.
Once this stage has finished, the triangle being drawn will now be visible.
Depth
While the above will give you a good general understanding of the what the GPU does when it renders something, there is of course slightly more complexity to this pipeline than discussed here.
An example of this is depth testing. If we draw a triangle overlapping another triangle, we need to know which one should be drawn on top of the other.
To achieve this, every time the GPU draws something, it also saves the current distance or "depth" from the camera of each pixel drawn to the window alongside it's RGB data. When a new triangle gets drawn, after rasterising it we can say that each pixel only has a fragment shader applied to it if it was closer to the camera than which ever pixel was there previously. If it's further away, the pixel gets discarded, giving us a way of drawing intersecting triangles pixel-by-pixel.
Programmable Stages
The first and third stages of this pipeline, the vertex and fragment shaders, are what's known as programmable stages. That means that you, the developer, must write the code to do these tasks, and is what we'll be looking at in the next few tutorials.
The middle step by contrast, rasterisation, is what's known as a fixed-function stage. This means that this stage is performed entirely automatically by the GPU for you. There are some advanced parameters we can alter to adjust exactly how the GPU performs rasterisation, but essentially this stage is done automatically for you, and we don't need to think too much about it.
Why are they called shaders?
We used the word "shader" a lot when talking about the stages of the GPU pipeline, so what do we actually mean by this?
Originally the entire GPU's pipeline was fixed-function and the programmer could only alter a few general parameters to tweak how rendering was done. You just provided your GPU with vertex data, perhaps some textures to render it with, and it produced the rendered image.
Eventually the final stage of this pipeline became programmable, allowing developers to heavily customise their renders and create some really powerful visual effects. This became known as the fragment (or pixel) "shader" to invoke the idea that it was doing some creative artistic process to draw the screen, taking into account things like lighting.
Eventually the vertex stage also became programmable, and the name sort of stuck, so it just became termed the "vertex shader". Over time the shaders have grown in scope, we have more types of shaders, and they have taken on tasks quite unrelated to the original meaning. The name has stuck though.
Despite whatever the name might imply though, shaders these days are really just small blobs of code (or "programs") designed to be executed on the GPU rather than on the CPU. They are generally small and simple in scope, and designed to be run in parallel.
Why do we use shaders?
The key point about shaders is the GPU. Shader programs are run on every vertex or pixel in parallel, to manipulate huge amounts of data in one shot.
We can therefore think of GPUs as really just specialist hardware for running code on each element of an array. They take a huge number of pixels or vertices, and some code provided by you, and their sole job is just to run that code on every element in parallel and get the result as quick as possible.
While the job of an individual shader might not seem to be so complex conceptually, we have to remember that for high performance programs, this need to be done for many millions of vertices per frame, and we're often targeting over a hundred frames per second. The tasks individually can absolutely be performed on the CPU with regular code, but this would be performed serially, and given the kind of performance we want, we really need specialist hardware and so our workflow needs to be designed around that.
Other types of shaders
While the rendering stages we've mentioned so far are essential in the rendering pipeline, more recent GPUs optionally allow for a few extra shader types to be present as well.
These additional shader types all lay between the vertex shader and the rasterisation stage, and all share the same general idea that it would be a powerful tool if developers could take the positioned vertices on screen and modify them somehow. A trivial example would be to recognise that if a highly detailed mesh is being rendered to a very small portion of the window, perhaps a few pixels, then much of the detail will be lost. Therefore, performance can be boosted by removing triangles and simplifying the mesh in real time, so the rest of the pipeline has less work to do. These shaders can also add in triangles too to increase the detail of our models, but that process is a bit more complex.
There are quite a few shader types to perform this task as the ideas and underlying hardware for achieving this has evolved over time. They include geometry shaders, tessellation shaders, and the more recent mesh shaders, although they all share the same overarching goals.
While certainly interesting and useful for special effects, and especially great for squeezing the absolute maximum performance from our hardware, they are optional and not necessary to achieve state of the art graphics. So for this basics tutorial series at least, we'll mainly be focusing on the "regular" rendering pipeline using vertex and fragment shaders.
You may also have heard of something called compute shaders too.
At some point it was realised that the process of applying a small program to each item in huge arrays of data in parallel on the GPU was actually useful for general programming tasks beyond graphics. As a result, compute shaders were created for this task. While they aren't useful for our graphics directly, they are a general purpose tool for solving specific kinds of tasks, and therefore might be useful for your program in other ways.
Compute shaders operate and look much like the other kinds of shaders we'll be learning about, it's just that the end result they are trying to achieve is the computation of some data, rather than performing part of a rendering process.
Summary
So conceptually we now have a high level understanding of how the GPU works. In the next lesson, we'll actually put these ideas into practice to draw a triangle to our window, which should hopefully really cement a lot of these ideas together.
To recap though and sort of plan out the next lesson, we can draw a triangle to our window in the following way.
First, we'll need to create some vertex data for our triangle and upload it into the GPU's memory.
To draw it, we'll need to write a vertex shader program which will map the triangle's vertices onto our 2D window.
The GPU will then automatically rasterise the triangle onto the window and figure out which pixels it occupies.
For each of these pixels, the GPU will then run a fragment shader program which we'll also need to provide our GPU with, in order to figure out what colour to set the pixel to, in effect "drawing" it.
Next lesson, we'll implement it!