
Introduction and Setting Up
Welcome to the first lesson in this tutorial series covering the basics of rendering graphics!
This lesson will be a quick one hopefully - we're going to look at how to setup and layout our workspace so that you can build and run the code for the rest of the lessons.
Libraries
Before we get into that though, I just want to take a minute to look at the libraries we will be using to build our program, and justify our choice over other similar tools.
OpenGL
In these tutorials, we will be using OpenGL (Open Graphics Library). OpenGL is essentially a standardised API between graphics cards/drivers and our program. It specifies various functions we can call to make cutting edge graphics appear on our screen in a way that can fully and automatically exploit the power and speed of GPUs. As the API is implemented by your graphics card driver, it should always be present on any up-to-date computer, and means your graphics code should run on pretty much any graphics card without alteration. It's a widely known and supported API.
The two main alternatives to OpenGL are DirectX and Vulkan.
DirectX is locked to the Windows platform so cross-platform programs are not really possible with it. Meanwhile, an OpenGL program can be compiled and run on Windows, Linux and Mac without any alterations to the code!
By contrast, Vulkan is a new graphics API released by the same community which organises OpenGL. While the two APIs perform similar roles, Vulkan is not a like-for-like replacement for OpenGL. Vulkan provides really low-level raw access to the GPU, while OpenGL leaves a lot of the tedious boiler-plate work up to the GPU driver.
As a result Vulkan programs can be ultra-optimised and so slightly faster, but it is far more complex code-wise, and the speed advantage is unlikely to be worth the extra effort unless you really are chasing after every possible performance gain. For this reason, OpenGL still has it's place, as its much easier and faster to code, and far more beginner friendly. If you are new to graphics, this is the place to start. And if you do decide to switch to Vulkan in the future, many of the concepts learned for OpenGL will directly translate to Vulkan.
SDL
OpenGL offers us a graphics API, but it is primarily focused on rendering. It will allow us to draw fantastic images, but we still need to create a window on our desktop to display it in - something OpenGL doesn't handle as it's only concern is rendering. To handle cross-platform window functions, we'll make use of SDL, a library designed exactly for this purpose. It handles creating a window on our desktop, getting mouse and keyboard input, toggling full screen and much more. Importantly again it abstracts all of these functions so that your code doesn't need to be changed whether you are compiling it on Windows, Linux or Mac. It's a very widely used tool, and is what major developers such as Valve use.
There are various alternatives to SDL, for example GLFW and GLUT. Both are excellent libraries. However SDL offers slightly more functionality in terms of audio and controller support, and is what I personally have been using for many years, and for that reason is the library we will use in these tutorials.
NOTE: For these tutorials, I've decided to target SDL version 3. This is the latest version as of the time of writing (2026). It's a fairly radical change compared to the previous versions, and has only really been available for a few months. The good news is that if you are following these lessons your program will be future-proof and this will be beneficial to your programs in the long run (there are some fantastic new features!). In the short term though, as it's so new, you may have some extra difficulty in setting the library up and finding support if issues arise.
Installation
Let's install all the tools and libraries we'll need to get up and running. We'll of course need a C++ compiler installed, as well as the SDL and OpenGL libraries.
We can install the GNU C++ compiler, g++, from our terminal, as well as various other build tools with the following command:
|
As OpenGL is technically just an API with an implementation provided by your graphics card driver, there is no need to install it. However, our program has no idea which functions exist in the driver - especially as OpenGL functions can evolve over time with new versions, accommodating new features on graphics cards.
Therefore we'll use a library called GLEW, or the OpenGL Extension Wrangler. This library handles connecting our OpenGL calls to those provided by the GPU driver at run-time, and provides header files that we can include in our project describing all the functions which exist for the version of OpenGL we want to target. It can be installed like this:
|
Finally, let's install SDL. Depending on exactly how new your Linux distribution is, it may or may not be available from your distribution's package repository. Therefore, I'll provide two installation options. The first option is to install SDL from the package manager, which is really quick and simple. The second option is to compile and install SDL yourself from the source code, which should work anywhere as a fallback option for older distributions.
SDL3 can be installed with the following command:
|
This is the easiest way to get SDL3 up and running on your machine, but if you have any issues try installing from source instead!
To install SDL3 from source, you'll first need to download the latest version of the source code from SDL's GitHub page using the web interface, or alternatively download it using git:
|
|
This will download a copy of version 3.4.10 of the source code.
You can check out the GitHub page if you want to see what other versions are available, I've simply chosen the latest stable release as of writing.
The --depth=1 flag here tells git not to bother downloading the full history of the code, only the current state, making the download much quicker.
When you have the source code on your machine, there is a guide on how to compile it inside SDL's doc folder named README-cmake.md.
The gist of it is that you need to first install the dependencies from here, which for Ubuntu looks like this:
|
With the dependencies installed we can then configure, compile and install the library:
| 1. | |
| 2. | |
| 3. | |
| 4. | |
| 5. | |
We move our terminal into the SDL folder.
Line 2 performs our configuration: checking any dependencies are met, writing configuration files about what features are present on the system, and configures the build process such that the root folder of the source code ("-S") is here ("."), and to build it into a new folder here called build.
The third line then performs the actual compiling of the code, and the fourth line installs SDL system-wide.
Our final line makes a call to ldconfig, which updates our system cache about which libraries are currently available.
SDL has now been compiled and installed from source!
NOTE: All instructions tested on Ubuntu 26.04!
Makefiles
With our libraries now ready, let's build a test program to check everything is working properly. To do this, we'll make use of a Makefile. If you've never used or heard of these before, don't worry. A Makefile is basically a file which explains how your program should be built. Perhaps you have traditionally compiled your code by typing something like this into a terminal:
|
Where g++ is our C++ compiler, main.cpp is our source code file, and we tell it to name the output executable my_program.
However, this is a pretty trivial example. Sometimes we have many, many files that need to be compiled, many libraries to link, and various other parameters to set. When things become more complicated, we don't want to keep typing out this command in full each time we want to compile. That's where Makefiles come in! And they're incredibly simple too.
Our example above can be rewritten as the following Makefile:
| 1. | |
| 2. | |
NOTE: Indentations in Makefiles must be full TAB indentations! Using spaces as indentations will not work. I don't want this website to start any political arguments about spaces vs tabs so let's just leave it at that!
To compile your hypothetical main.cpp code using this, you can save the above example as a regular text file named Makefile (note the capital "M", and no file extension) in the same directory as your code.
To run it, we just need to be in the same directory in our terminal, and type make.
Its as easy as that!
So what does the keyword all mean here?
Well, the Makefile allows us to specify different targets, which are just components that we can build individually.
This way, if you had a particularly large project, you could just type into your terminal make gui and just that part of your code can be (re-)compiled.
By convention, we name the target which compiles everything, the whole program, as "all", and place it as the first target in our Makefiles.
If there is not a specific target typed into the terminal (ie. they simply typed "make"), the first target in the Makefile will be run, which by convention should compile the whole program.
So in our example above, if we typed make all into our terminal, make would look for the the indented block of commands after the all target in our Makefile and run those, building our program.
Alternatively, if we typed just make, by virtue of being the first target of perhaps many in the Makefile, the same all target would be run, just with a bit less typing!
Note that the commands here for each target are just ordinary terminal commands.
Therefore you are not limited to just compiling things with g++, but can run regular commands like cd, ls, or even zip here across multiple indented lines.
Makefiles also allow you to set up many other things, such as dependencies, but I will keep this lesson simple for now.
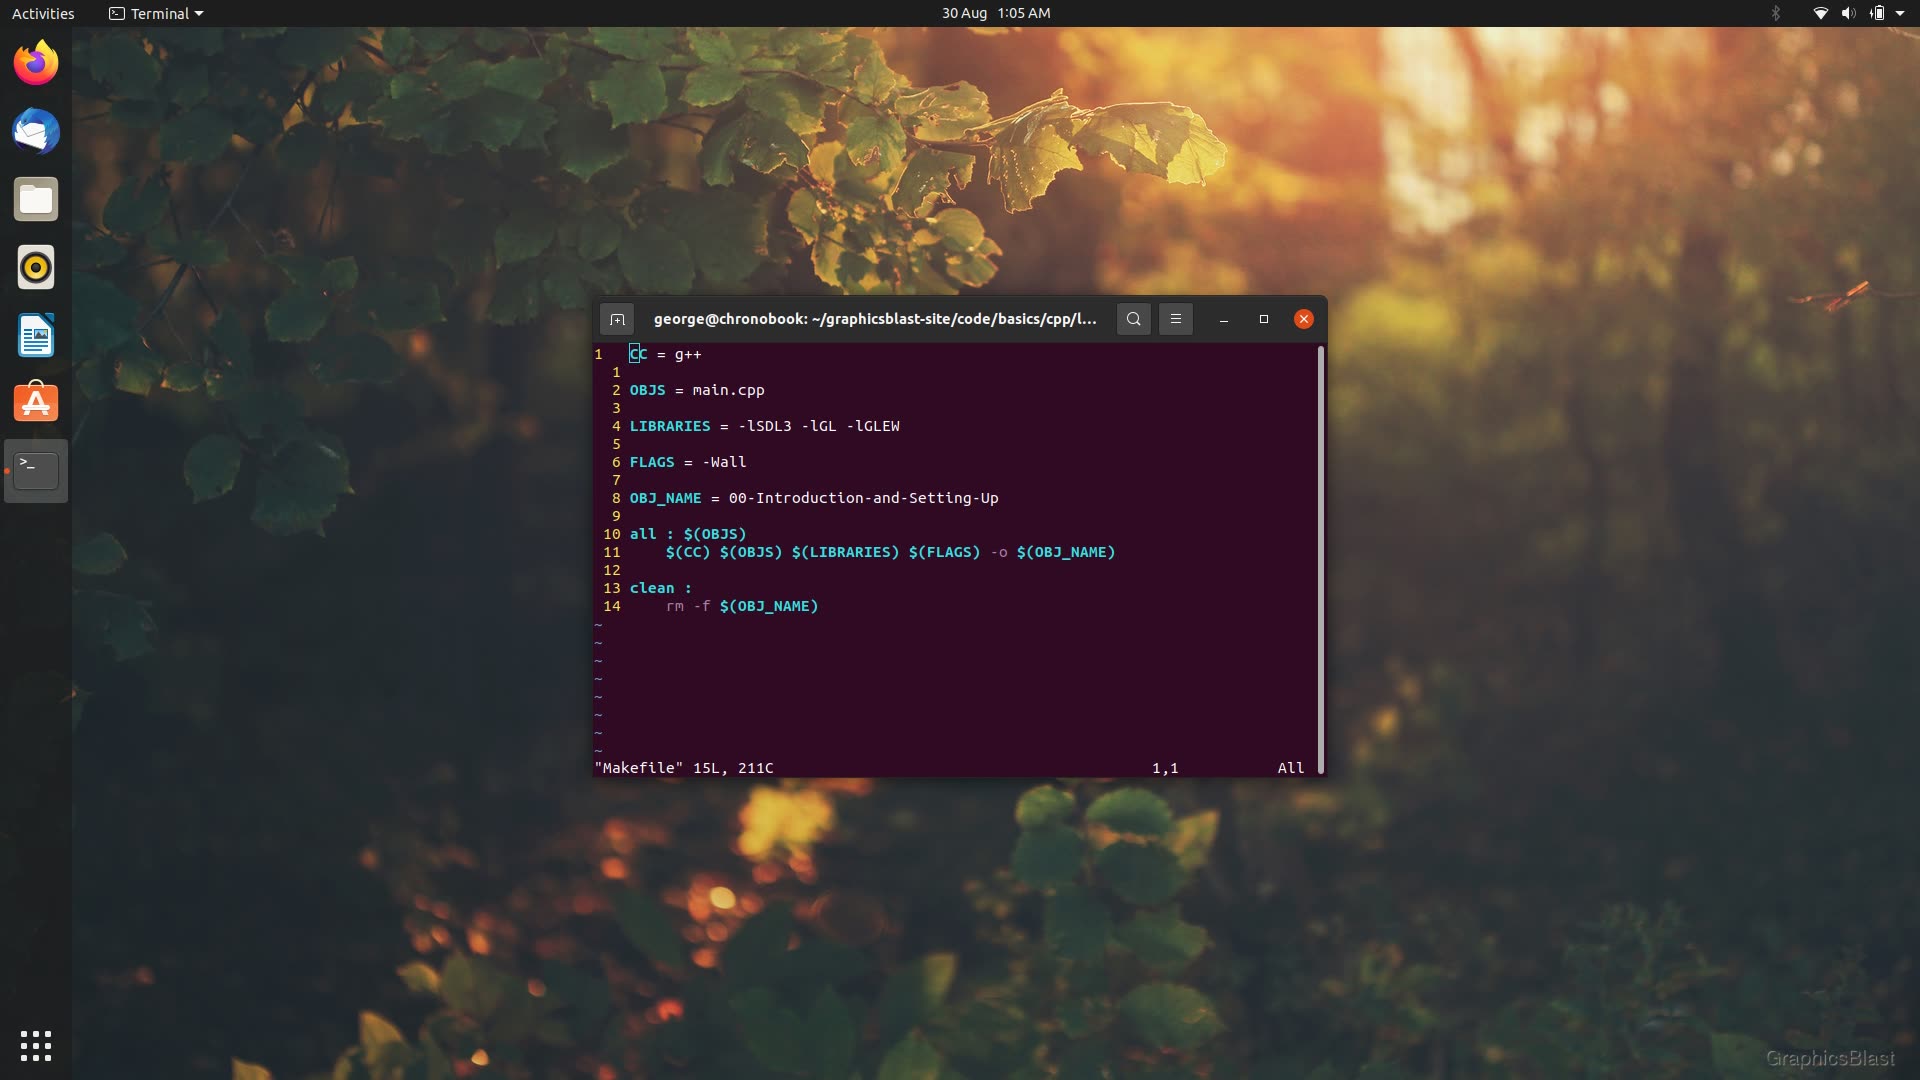
Let's introduce a few variables into our Makefile to make it easier to customise in the future:
| 1. | |
| 2. | |
| 3. | |
| 4. | |
| 5. | |
| 6. | |
| 7. | |
| 8. | |
| 9. | |
| 10. | |
| 11. | |
| 12. | |
Alright, that's quite a lot of variables actually! Let's take it line by line.
We started by defining a variable to hold the name of our compiler, CC.
The idea is that if you are compiling lots of things and at some point wish to change the compiler, you just need to edit this one variable, instead of every line where something is compiled.
We define another variable to hold the names of all the objects we wish to compile (source files), and one to hold the names of the libraries we want to link against.
In this case we link against the SDL library (-lSDL3), OpenGL (-lGL) and to GLEW (-lGLEW).
Another variable is used to hold any compiler flags we want to use - in this case just -Wall which means to throw all compiler warnings so we get into good habits from the start!
We variablise the output program name too.
If you don't provide a name, g++ will give your executable the fairly ugly default name of a.out, so we'll use this variable to give your program a reasonable name.
Finally, at the very bottom of our Makefile, we write what's known as the recipe for our target, similar to what we did before.
After the target's name, all, we start by adding the $(OBJS) variable on the same line to make it a dependency.
The $(OBJS) variable will immediately be substituted for each filename of our source code.
Make will therefore know that those files must exist in order to continue compiling.
Then to actually compile our program, we just combine the rest of our variables together to form our compile command.
If we save this file and run it (terminal, go to the right folder, type make), make will display the commands it is running, and we will see that the above script results in this command being run in the terminal:
| 1. | |
Which is exactly what we want!
It's far easier to now just type make each time we want to compile rather than typing out the command in full each time.
Realistically the only time we will ever change our Makefile is if we need to compile an extra source code file, or perhaps if we link to another library.
Cleaning Up
There is one more thing I want to show you about Makefiles before we start building a real program.
Quite often, compiling creates files which "pollute" our workspace. This can be temporary files from our text editor, other temporary files, or perhaps object files if you choose to do some really fancy compiling procedure. Even the executable file itself.
Therefore it is common to add a target to your Makefile called "clean". The idea is that this will just go through and delete all the unnecessary files you have accumulated. It will get your workspace back to a "pure" state, untouched by your compiler.
Right now, the only thing I'll do is to remove the executable, but you can modify this later if you want to remove anything else. Let's add it to the bottom of our Makefile:
| 1. | |
| 2. | |
| 3. | |
| 4. | |
| 5. | |
| 6. | |
| 7. | |
| 8. | |
| 9. | |
| 10. | |
| 11. | |
| 12. | |
| 13. | |
| 14. | |
| 15. | |
Now, when someone types make clean into the terminal, make will look for a target with that name, and run the corresponding terminal commands, in this case deleting our executable file.
The -f flag ensures if the file does not exist, no error messages will be shown, so it is fine to run make clean repeatedly.
Testing our set-up
With the above Makefile now in place, let's perform a quick test that everything is working correctly before moving on with our lessons.
Copy-and-paste the following code into a file named main.cpp in the same folder as the Makefile:
| 1. | |
| 2. | |
| 3. | |
| 4. | |
| 5. | |
| 6. | |
| 7. | |
| 8. | |
| 9. | |
| 10. | |
| 11. | |
Don't worry about the actual code too much here - we cover it in the next lesson. For now we just want to check the compiler can find our libraries and build our program.
Open a terminal, go to your workspace and run make.
That will compile the program, and hopefully no errors appear.
Then you can type ./00-Introduction-and-Setting-Up to run the executable file created, and if everything is working you should see "We are running!" appear in your terminal.
If something goes wrong, make sure you have SDL installed properly and no errors occurred during installation.
Make sure that both the Makefile and main.cpp are in the same directory, and that you are currently in that folder in your terminal when typing make.
Also remember that a Makefile needs to be named with a capital "M", and uses only tabs for indentations - no spaces!
Alternatively, if you're having problems you can download and try my version of the files using the buttons just below, and try to compile those.
Otherwise if everything is working then you can move onto the next tutorial!